
While many believe the essence of a home wellness retreat lies entirely behind the sauna door, the real secret to a transformative experience lies in the transition. In a typical session, you actually spend 60% to 70% of your time outside the high-heat zone—cooling down, hydrating, and finding your center between rounds. Because this flow is so vital, Home Sauna is the best resource for discovering the best home saunas and the surrounding suite design that turns a simple heater into a true sanctuary.
Designing a complete home sauna wellness sanctuary is a delicate balance of layout, storage, and temperature control. Whether you are retrofitting a compact indoor corner or constructing an expansive backyard cabin, the changing area serves as the essential bridge between the stress of the day and the deep recovery of the heat.
Our expertise in low-EMF infrared systems and traditional hot rooms informs how we help you plan these spaces, ensuring that every square foot—from towel warming to smart control integration—works in harmony with your lifestyle.
This guide provides actionable, room-by-room concepts to help you master the "outside-the-box" elements of your project. We’ll walk through clever storage solutions and layout strategies that maximize flow, allowing you to build a cohesive environment that supports your recovery long after you’ve stepped out of the heat.
Key Takeaways
- A well-planned changing area is as important as the hot room itself. Size it at roughly 1.5 to 2 times the sauna footprint for 4 to 6 users to ensure comfortable circulation and storage.
- Design your layout around a logical flow: arrive, undress, store clothes, shower or rinse, enter the sauna, cool down, repeat, then dress. Keep benches, storage, and the sauna door within a compact triangle to minimize wet footprints.
- Maximize small footprints (25 to 120 sq. ft.) with L-shaped benches featuring hinged lids, wall cabinets, and tiered vertical hook rails that serve multigenerational families.
- Select towel warming solutions based on your setup: hardwired rails for permanent suites, plug-in racks for retrofits, bucket warmers for tight spaces, and bench heaters paired with infrared or traditional saunas.
- Integrate smart controls and app compatibility so heaters, lights, ventilation, and towel warmers can be scheduled and managed from your phone or voice assistant before you even step through the door.
Why Does Your Sauna's Changing Area Layout Matter?
The layout should be designed around the user flow rather than simply accommodating where walls or plumbing currently sit. When you start with how people actually move through the space, everything else falls into place more naturally.
The ideal sequence looks like this: arrive at the entrance zone, hang outdoor clothes, move to the bench zone for undressing, step to the rinse or shower area, enter the sauna, return to the bench for cooling, then dress and exit. This loop can repeat multiple times during a single session, so minimizing friction at each transition point matters.
Keep the hot room door, shower, and main bench within a compact triangle (no more than 6 to 8 feet apart) to minimize wet footprints and prevent drafts from disrupting the space.
Place the primary bench on a wall that does not face directly toward exterior doors or large windows. This preserves privacy and creates a cocooned, relaxing atmosphere. In compact setups such as retrofitting a 6-by-10-foot basement room, linear layouts work best: a door at one end, a bench and hooks mid-room, a shower or rinse station, then a sauna door at the far end.
How Large Should Your Sauna Changing Area Be?
For new builds in 2025 to 2026, target 45 to 60 sq. ft. for a 4 to 6-person hot room and roughly 70 to 120 sq. ft. for the adjacent changing room when building from scratch. This ratio ensures comfortable circulation, adequate storage, and room for a small rinse zone or cooling bench.
A concrete example: a 10-by-10-foot outbuilding split into a 6-by-10-foot sauna and a 4-by-10-foot changing room comfortably serves 1 to 4 users. Reserve a small corner for a shower column or, if available space allows, a compact cold plunge tub.
For small-home installations, 25 to 35 sq. ft. changing nooks can still function beautifully when you incorporate wall-to-wall benches and vertical storage. A 5-by-7-foot converted secondary bathroom, for instance, can accommodate a bench along the long wall opposite the door, with the sauna door offset to one corner, creating clear sightlines and efficient traffic flow.
Doorways, Circulation, and Privacy
Minimum 32-inch clear doorways and 36-inch walking clearance in front of benches prevent congestion when two people move at once. This clearance is validated in case studies of home spa installations where bottlenecks undermined otherwise excellent designs.
Outward-swinging or pocket doors work best for compact sauna suites, especially in basement and bathroom conversions. They prevent steam from the hot room from entering the changing area and comply with building codes, such as the International Residential Code.
Position the changing room entrance so it does not provide a direct line of sight from the hallway or living spaces to the primary bench or towel area. In recent builds, higher window sills (around 48 inches from the floor) or frosted glass preserve natural light while shielding bathers, an excellent choice for maintaining both privacy and a bright interior.
What Are the Best Space-Saving Layout Ideas for Small Changing Rooms?
Many Home Sauna customers retrofit existing bathrooms, laundry rooms, or 8-by-8-foot backyard sheds. These projects require creative thinking about how to combine seating, towel storage, and circulation without sacrificing comfort or airiness.
The goal in small spaces (roughly 65 to 85 sq. ft.) is to make every element serve multiple functions. All the layout ideas below work for both traditional and the best infrared sauna setups, including compact, plug-and-play infrared cabins installed in an existing room.
L-Shaped and Wall-to-Wall Benches
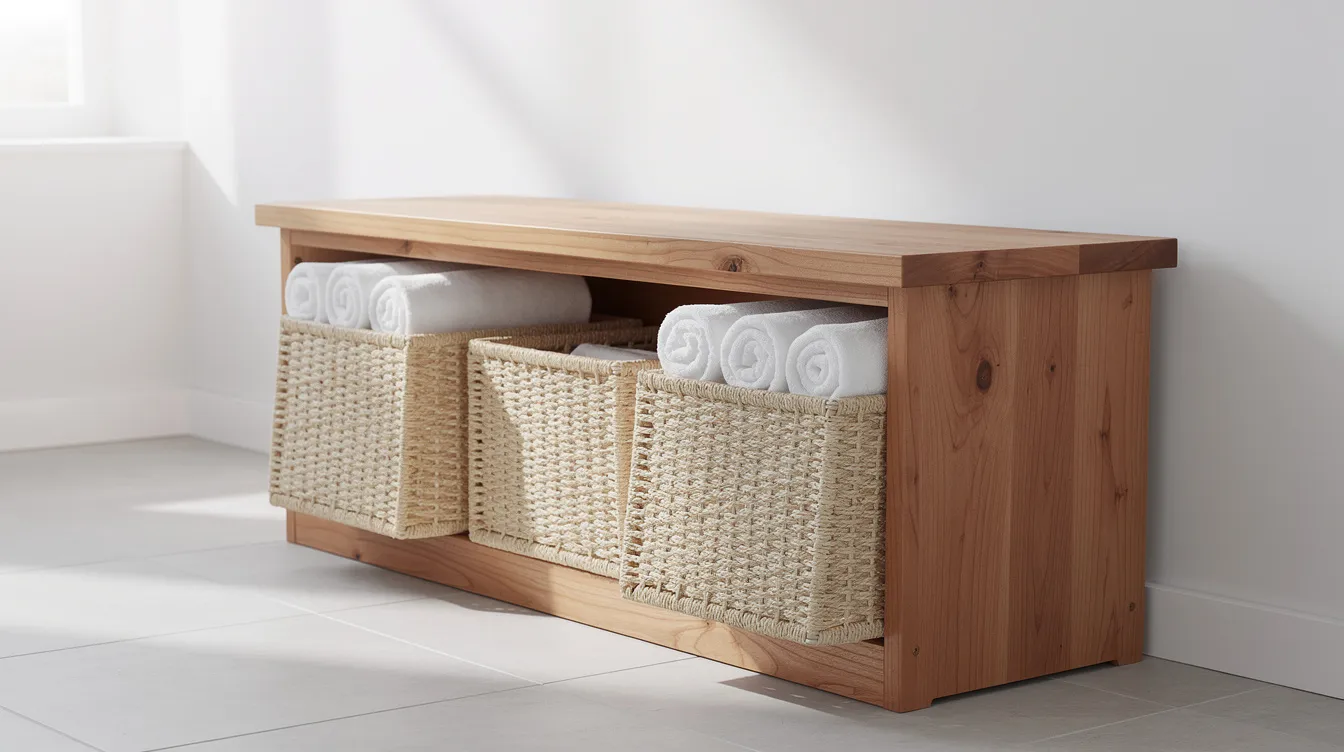
An L-shaped bench built from cedar, thermally treated aspen, or birch plywood along two walls in a 5-by-7-foot nook maximizes seating while opening the floor for circulation. Add hinged lids with soft-close hardware for under-bench storage. Each 4-foot section can hold 8 to 10 full-size cotton towels rolled or folded vertically.
For ultra-narrow entries (for example, 3 by 7 feet), a wall-to-wall bench solution turns the entire long wall into a seat with shoe storage drawers or bins tucked underneath. This freestanding design works particularly well in lakeside cabins, where the bench doubles as a daybed or a guest overflow bed during visits.
Recommended bench dimensions:
|
Measurement |
Specification |
|
Height |
17 to 18 inches |
|
Depth |
16 to 18 inches |
|
Lid clearance |
Soft-close, finger cutouts |
These proportions balance seated comfort with room for sturdy storage compartments beneath.
Vertical Storage and Flexible Furniture
Walls above benches can host a 10- to 12-inch-deep floating shelf at about 60 inches high, plus a row of hooks or a wooden rail below for robes. This vertical approach leaves the floor clear while keeping towels and accessories within easy reach.
Tiered hook rails serve multigenerational families effectively:
- Top rail at 70 inches: adult robes
- Middle rail at 55 inches: hand towels
- Lower rail at 40 inches: kids' hooks
Foldable stools or nesting benches can be carried outside to a deck for cooling off in summer, especially useful for outdoor sauna cabins. Small rolling carts with lockable casters hold oils, brushes, and aromatherapy accessories, tucking under benches when not in use.
What Are the Best Storage Solutions for Towels, Robes, and Sauna Accessories?
Dry, well-organized storage keeps towels fresh, protects wood surfaces, and helps the room feel like a spa rather than a gym locker room. Ventilation is as important as capacity: open or slatted designs generally outperform sealed plastic bins in humid zones.
Frame your storage planning around typical household use. A family of four using the sauna 3 to 4 evenings a week needs a different capacity than a couple hosting occasional weekend wellness sessions with guests.
Bench-Based and Under-Bench Storage
Box benches built from kiln-dried cedar or spruce with lift-up lids offer superior craftsmanship while maximizing function. Each 4-foot section holds 8 to 10 full-size towels when items are rolled or folded vertically, a method that also improves air circulation.
Add discreet finger cutouts or soft-close hardware to prevent lids from catching bare skin. Simple open cubbies under benches work well for woven baskets that separate clean towels, used towels, and accessories like brushes or wool hats.
Line under-bench compartments with removable slatted mats to encourage air circulation and make cleaning easier. This small addition dramatically reduces moisture buildup and extends the life of stored textiles.
Wall Cabinets, Shelves, and Hook Strategy
A shallow wall cabinet (8 to 12 inches deep) mounted at least 24 inches above the bench avoids hitting heads while seated. The ceiling should offer enough clearance for comfortable access without feeling cramped.
Differentiate open vs closed storage:
- Open shelves: daily-use towels in breathable baskets
- Closed cabinets: backup textiles and cleaning supplies
Individual hooks on log or stone walls preserve a rustic look, while continuous wooden or stainless rails work better on smooth drywall or tile. Space hooks 8 to 10 inches apart to allow thick Turkish or organic cotton towels to dry without touching and forming mildew.
Dedicated Storage for Sauna Gear and Cold Plunge Accessories
Include at least one drawer, pull-out tray, or labeled bin specifically for ladles, thermometers, aromatherapy oils, and red-light accessories. This dedicated spot prevents cross-contamination between sauna gear and everyday bathroom items.
For cold plunge setups, a ventilated crate or cubby near the door leading outdoors or to the plunge zone holds neoprene booties, mitts, and wool hats. A small, closed cabinet or vanity drawer with a soft liner protects personal items like watches, phones, and jewelry from scratches during sessions.
Many Home Sauna customers appreciate having a dedicated spot for instruction manuals and app setup cards for their smart heaters and towel warmers, keeping everything organized for expert guidance when needed.
What Are the Best Towel Warming Solutions for Sauna Changing Areas?
Towel warming is a simple upgrade that transforms a basic sauna routine into a timeless luxury home-spa ritual. The difference between wrapping yourself in a cold towel versus warm towels after an intense heat session is remarkable, especially in colder climates from October through March.
Most towel warmers belong in the changing room or adjacent bathroom, not inside the high-heat sauna room. Temperatures inside traditional saunas reach 180 to 200 0F, which can damage electronics, void warranties, and pose safety concerns. Position your warmer for safe operation outside the hot zone while maintaining easy access from the sauna door.
Selection depends on available wall space, electrical work requirements, and whether the sauna is in a permanent home spa or a flexible rental or vacation cabin.
Hardwired Electric Towel Warmers
Wall-mounted ladders or panel-style warmers hardwired to a dedicated circuit typically warm towels to 110 to 140 0F in 15 to 30 minutes. These units draw 300 to 600W and require a dedicated circuit installed by a licensed electrician.
They suit new builds or full renovations (2024 to 2026 bathroom and spa remodels) where electrical work can integrate them with lighting and fan circuits. Position them 4 to 6 inches from the floor and at least 8 to 10 inches from adjacent cabinets or doors for safe heat circulation.
Many modern models include built-in timers and thermostats, and are compatible with smart switches for app scheduling, making them ideal for integration into a unified control interface.
Plug-In and Freestanding Towel Racks
Plug-in freestanding units are ideal for retrofits or rentals, requiring only a grounded outlet and offering flexibility to move between the bathroom and the changing area. This portability makes them popular for customers who are not ready to commit to permanent installation.
Slim, ladder-style racks fit narrow 3 to 4-foot-wide walls, while compact bucket or canister warmers work for very tight rooms where wall space is already covered by benches. Freestanding racks should sit on non-slip pads or a sturdy base, positioned out of direct drip lines from showers or cold plunge exits.
Choose models with automatic shut-off (60- to 90-minute timers) and cool-touch handles for family homes. This safety feature prevents overheating when the warmer is forgotten after a session.
Hydronic Rails and Bench Warming Options
Hydronic towel rails tied into radiant floor or boiler systems provide gentle, consistent warmth at 80 to 120 0F with 20 to 50 percent better energy efficiency than electric alternatives. They are best suited to whole-house projects where a mechanical contractor is already on site.
The higher upfront complexity means you need to plan locations early in the design phase. Retrofitting hydronic systems later is costly and disruptive.
Low-voltage heated benches offer another approach: seats built with embedded heating mats or cables (24 to 48V) under wood tops keep sitting surfaces warm between sauna rounds. Pair heated benches with towel hooks positioned above, so users step out of an infrared or traditional sauna, sit on a warm bench, and wrap in a pre-warmed towel for the ultimate home sauna installation experience.
Choosing the Right Towel Warmer for Your Setup
|
Warmer Type |
Best For |
Installation |
Capacity |
|
Hardwired rails |
Permanent indoor suites |
Electrician required |
2 to 4 bath sheets |
|
Hydronic rails |
Large new builds |
Plumber/contractor required |
Multiple towels |
|
Plug-in racks |
Retrofits, apartments |
DIY, outlet only |
2 to 3 towels |
|
Bucket warmers |
Small apartments, tight spaces |
DIY, countertop |
1 to 2 hand towels |
Check IP ratings and manufacturer guidelines for use in damp zones, especially within a few feet of showers or rinse columns. Most towel warmers require an IP44 rating or higher for wet zones.
Measure your typical household load (e.g., two bath sheets and two hand towels) and choose capacity accordingly, rather than under sizing. Light finishes like brushed stainless or matte white complement Scandinavian-style interior design, while matte black or bronze warmers suit darker, moodier changing rooms.
How Do Smart Controls and App Compatibility Improve the Changing Area Experience?
Modern home sauna wellness setups integrate sauna heaters, towel warmers, ventilation, and lighting into one controllable system. The ability to preheat your sauna and start the towel warmer from your phone while driving home or finishing a workout transforms the entire sauna experience.
Choosing hardware with compatible smart protocols early prevents frustration and the need for extra hubs later. Planning this integration during the design phase rather than as an afterthought saves both time and money.
Smart Sauna Heaters and Changing Area Controls
Wi-Fi-enabled sauna heaters and infrared cabins connect to 2.4 GHz home networks, allowing temperature and timer control via brand apps. Many Home Sauna models feature built-in smart capabilities that work seamlessly with existing home automation systems.
Place wall-mounted control panels just outside the hot room door in the changing area, at a comfortable 48 to 54 inches off the ground for easy reach. Common integration with Amazon Alexa, Google Home, and Apple HomeKit enables scenes like "Sauna Night" that adjust the heater, towel warmer, and lighting together with a single voice command.
Include an easy-to-read physical display and manual override buttons for guests or when phones are not nearby. This redundancy ensures your system remains functional even during network outages.
Smart Towel Warmers, Plugs, and Switches
Some premium towel warmers have built-in Wi-Fi, programmable schedules, and energy-tracking features accessible through manufacturer apps. These higher-end options offer the most seamless integration but come at a premium price point.
Smart plugs or in-wall smart switches rated for the warmer's wattage provide a simpler way to automate basic plug-in racks or bucket warmers. This approach lets you add intelligence to existing hardware without replacing it entirely.
Always use GFCI protection in damp areas and ensure smart devices carry appropriate safety ratings (UL or ETL listings). Avoid placing outlets or smart devices where they could be exposed to direct spray.
Set preheat routines (for example, towel warmer turns on 20 to 30 minutes before a regularly scheduled evening sauna session) to avoid forgetting. Most smart home platforms support time-based automation, making this effortless.
Lighting, Audio, and Ventilation Control in the Changing Area
Dimmable, warm-white LED lighting (around 2,700 to 3,000K) controlled via a smart dimmer creates gradual transitions from bright pre-sauna prep to softer, relaxing post-session ambience. This attention to lighting dramatically affects the overall mood.
Moisture-rated downlights or wall sconces on separate circuits for the shower or wet room, and for the main bench area, provide flexibility. You might want brighter light for showering and dramatically dimmer light for cooling and relaxation.
A small, moisture-resistant Bluetooth speaker system or sound bar works well for playlists or guided breathwork sessions. Control it via phone for seamless integration with your routine.
Use a humidity-sensing exhaust fan or smart switch that triggers when humidity spikes after showers and sauna rounds. This automated ventilation prevents moisture buildup that leads to mold and extends the life of all materials in the space.
How Do You Integrate Cold Plunge and Cooling Zones with Your Changing Area?

Contrast therapy (alternating heat from a sauna with cold immersion or showers) has become increasingly popular among athletes and wellness enthusiasts. Studies suggest massive recovery benefits for athletes using regular contrast therapy protocols.
The changing area often becomes the hub connecting the hot room, cold plunge, and outdoor or relaxation zones. Home Sauna offers cold plunge tubs that can be integrated just outside sauna buildings or in adjacent wet rooms.
Placement Options for Cold Plunge Tubs
A common backyard configuration positions a traditional or full-spectrum sauna cabin at one end of a 10 to 15-foot deck, with a cold plunge tub and outdoor shower 3 to 6 feet away. This proximity enables quick transitions while keeping equipment appropriately separated.
For indoor installations, a shared wet room adjacent to the changing area works well. The cold plunge tank, rain shower, and hand shower share the same drain and waterproofing system, simplifying construction and maintenance.
Route traffic so bathers step from the hot room to the quick rinse to the plunge to the changing bench, minimizing water carried through dry zones. Non-slip tile, drainage slopes, and grab bars near cold tubs are essential for safety during the temperature shock of cold immersion.
Practical Add-Ons Around the Plunge Zone
Heated stepping stones or mat runners between the sauna door and plunge prevent ice buildup in colder climates and provide comfort underfoot during transitions.
A dedicated hook rail or small shelf near the plunge keeps cold plunge robes, beanies, and gloves accessible but dry. Positioning these items strategically reduces the distance users travel while wet.
Subtle pathway lighting (low-voltage step lights along the floor) connects the changing area and outdoor plunge for early-morning or evening use. Smart plugs and outdoor-rated switches can control plunge chillers and lighting on schedules or via phone, tying into the overall spa routine.
What Materials and Maintenance Practices Keep a Changing Area in Top Condition?
Moisture, temperature swings, and heavy towel use mean the changing area must be designed for easy cleaning and durability. Choosing sauna-friendly materials upfront prevents costly replacements and preserves the premium feel of your installation for years.
Avoid placing MDF or unsealed particleboard anywhere in the changing area. These materials swell up to 25 percent when exposed to moisture and will fail quickly. Cedar, thermally modified wood, porcelain tile, and glass remain top choices that withstand the environment.
Designing for Easy Cleaning
Smooth, non-porous floor surfaces like porcelain or ceramic tile with matte or textured finishes provide grip while making cleaning straightforward. Pair these with epoxy or high-quality grout for maximum moisture resistance.
Design built-ins with rounded corners and avoid tight, unreachable gaps behind benches and cabinets where moisture and lint collect. A few extra inches of clearance behind furniture makes weekly maintenance dramatically easier.
Seal wood benches with sauna-safe oils or finishes rated for humid interiors, reapplying every 1 to 2 years depending on use frequency. Removable, washable covers for cushions and rugs (cotton or linen slipcovers and machine-washable round rugs) simplify ongoing care in relaxation zones.
Post-Session Hygiene Routines
A simple 5 to 10-minute routine after each session preserves your space:
- Hang towels spaced apart or move them directly to the laundry
- Wipe benches with a microfiber cloth
- Crack a window or run a fan for 15 to 20 minutes
Keep a small caddy with microfiber cloths, mild wood-safe cleaner, and glass cleaner in a closed cabinet for quick wipe-downs. This convenience encourages consistent habits.
Weekly tasks include mopping floors, disinfecting door handles and control interfaces, and checking towel warmer bars for dust or residue buildup. Rotate towels so the same set is not used multiple days without proper drying. This prevents mildew and extends fabric life.
Protecting Electronics and Smart Hardware
Place control panels, smart plugs, and outlets at safe distances from direct spray, typically outside shower splash zones and at least 12 inches above the finished floor. Use devices rated IP44 or higher in damp locations.
Avoid running low-voltage control cables where they can be submerged or kinked. Annual inspection of cables, seals, and gaskets around lighting fixtures and heater controls catches problems early, especially in outdoor sauna cabins exposed to seasonal changes.
Back up or document your app configurations (scenes, schedules) so they can be quickly restored after router changes or device upgrades. This small habit saves frustration when technology inevitably needs updating.
How Does Home Sauna Support Your Changing Area Design?
Home Sauna positions itself as a partner not only for the hot room (infrared, full-spectrum, traditional, and outdoor units) but also for the surrounding changing, cooling, and recovery spaces that create a complete wellness experience.
Many of our models feature plug-and-play construction, making them easy to integrate into existing bathrooms, basements, or bonus rooms without structural rebuilds. This flexibility means installing a premium sauna becomes a realistic project for homeowners who build saunas as retrofits rather than ground-up construction.
Our advisors can help match sauna size, heater type, and control interfaces to the specific room dimensions and changing-area concepts you are considering. We encourage you to measure your available space, sketch a basic plan, and contact us with dimensions and photos for tailored suggestions.
What Our Team Can Help You Plan
Our consulting covers several key areas:
- Hot room selection: choosing between infrared and traditional, sizing for 1 to 6 users
- Storage planning: aligning changing room storage with expected towel and accessory volume
- Smart integration: selecting heaters, towel warmers, and fans that share app ecosystems or work with existing Alexa, Google Home, or HomeKit setups
- Cold plunge pairing: recommended clearances, surfaces, and practical traffic routes for year-round use
Ready to design a sauna changing area layout that complements your premium wellness investment?
Visit Home Sauna today for expert guidance on space planning, curated accessories including heated towel solutions, and custom storage systems that complete your home sanctuary. Don't leave critical design decisions to chance when professional consultation ensures every session feels like a luxury spa visit.
References
- International Code Council: “Overview of the International Residential Code (IRC).”
- Ledify: “What IP Rating is Required for Sauna Environments?”
- Research Gate: Effectiveness of the Contrast Technique as Recovery After Effort According to Professional Athletes.”
Woodworking Network: “MDF Stability - Is MDF Less or More Stable Than Solid Wood?”
FAQs
How big should my sauna changing area be compared to the sauna itself?
For a typical 4 to 6-person sauna (45 to 60 sq. ft.), a changing area about 1.5 to 2 times that size (roughly 70 to 120 sq. ft.) feels comfortable with seating, storage, and a small rinse zone. Very compact homes can work with 25 to 35 sq. ft., with nooks changing to wall-to-wall benches, vertical shelving, and efficient hook layouts. Maintain at least 36 inches of clear walkway in front of benches and use outward-swinging or pocket doors to prevent congestion.
Can I put a towel warmer inside the sauna hot room?
No. Most electric or hydronic towel warmers are not designed for the extreme heat and humidity inside a sauna and should be placed in the changing room or adjacent bathroom. High sauna temperatures (180 to 200 degrees F) can damage electronics, finishes, and wiring, and typically void manufacturer warranties. Mount towel warmers within easy reach of the sauna door, following the manufacturer's clearances, and always use GFCI-protected circuits in wet-adjacent spaces.
Do I need a separate shower next to my changing area?
While a dedicated shower or rinse station beside the changing area improves comfort and hygiene, it is not strictly mandatory if a nearby bathroom already has a shower. At minimum, include a handheld shower or bucket rinse setup near the sauna in outdoor builds for quick cooling and rinsing sweat. Proper ventilation and drainage in any shower or wet zone prevent mold and protect wood and smart hardware.
What materials are best for benches and cabinets in a damp changing room?
Moisture-tolerant woods like Western Red Cedar, thermally modified aspen, or spruce work well for benches, open shelving, and cabinet fronts. Use stainless steel or coated fasteners to prevent rust, and avoid raw MDF or unsealed particleboard, which can swell and warp in humidity. Porcelain or ceramic tile works best for floors and baseboards, with silicone-sealed transitions where wood meets tile.
Can I control my sauna, lights, and towel warmer from my phone?
Yes. Many modern sauna heaters and towel warmers support Wi-Fi, Bluetooth, or ZigBee protocols, enabling app-based control for temperature, timers, and schedules. They are compatible with popular platforms like Amazon Alexa, Google Home, and Apple HomeKit, allowing scenes that coordinate heater preheat, lighting levels, and towel warming. Before purchasing devices, confirm protocol compatibility (typically 2.4 GHz Wi-Fi) with your existing router and smart home ecosystem.