
The home wellness market has experienced significant growth in recent years, with an increasing number of homeowners seeking to create personal retreat spaces within their own properties. Among these wellness additions, saunas have emerged as one of the most sought-after features, offering both relaxation benefits and potential property value enhancements.
Whether you're drawn to the stress relief of a traditional sauna experience or the infrared sauna health benefits of regular sessions, building your own home sauna can be a rewarding project that provides years of enjoyment. Understanding the different types of saunas helps you make informed decisions about your project.
This comprehensive guide walks you through every aspect of sauna construction, from initial planning and material selection to the final finishing touches. You'll learn how to navigate the decision between sauna kits and custom builds, understand the electrical and ventilation requirements, and discover the step-by-step process for creating your own personal oasis.
By the end of this guide, you'll have the knowledge and confidence to tackle this exciting home sauna installation project.
Key Takeaways
- Building a home sauna typically costs $3,000-$20,000, depending on size and materials
- Most DIY saunas take 14-20 hours to complete using pre-cut kits or 40-60 hours for custom builds
- You need a 220V electrical connection and at least 4x4 feet of floor space with 7+ foot ceilings
- Western red cedar is the preferred wood material for its moisture resistance and natural aroma
- Proper insulation and vapor barrier are essential to prevent moisture damage and maintain heat efficiency
How Should You Plan Your Home Sauna Project?
Successful sauna construction begins with thorough planning. This project involves electrical work, structural considerations, and specialized materials that require careful coordination. Unlike simpler DIY projects, building a sauna room demands attention to building codes, proper ventilation, and safety requirements.
Before purchasing materials or starting construction, assess your space, determine your electrical capacity, and, if necessary, obtain permits from your local building department. Most jurisdictions treat saunas as significant electrical installations requiring professional inspection.
Timeline and Project Phases
The timeline varies significantly based on whether you choose a sauna kit or opt for a custom build. Kit assembly typically requires 14-20 hours spread over 2-3 weekends for beginners, while custom builds can take 40-60 hours depending on complexity and your skill level.
Factor in additional time for electrical rough-in, permit approvals, and any structural modifications needed for your chosen location. Quality checkpoints at the end of each major phase help catch problems early when they're easier to address.
First-time builders often underestimate the time required for detail work like vapor barrier installation and precision paneling. Build extra time into your schedule rather than rushing through critical steps that affect long-term performance.
Where Should You Build Your Home Sauna?
The location of your home sauna impacts both construction complexity and ongoing enjoyment. Indoor saunas offer year-round accessibility and easier integration with existing electrical and ventilation systems.
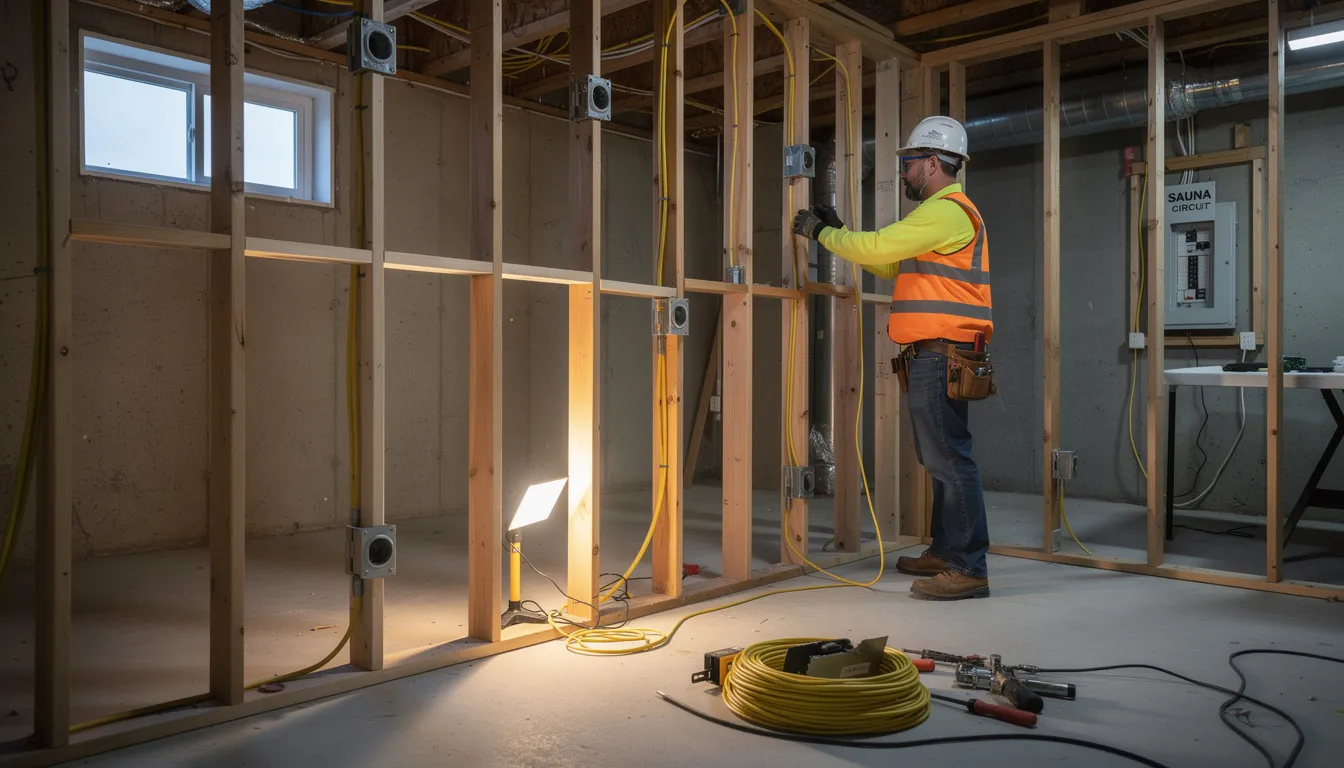
Basements are particularly popular because they offer natural privacy, stable temperatures, and easier access to electrical panels for the required 220V circuit installation. The concrete floor provides an excellent base that can be sealed with epoxy paint for waterproofing.
Electrical Requirements
Electrical requirements are non-negotiable for most installations. Electric heaters typically require dedicated 220V circuits ranging from 20 to 50 amps, depending on the unit size. This circuit must be installed by a licensed electrician and properly protected with GFCI devices as required by local codes.
Plan for the electrical rough-in early in your project timeline. This work often requires inspection before you can proceed with insulation and finishing.
Minimum space requirements include at least 4x4 feet of floor area and 7+ foot ceiling height for comfortable use. However, these dimensions create a very compact sauna suitable for 1-2 people.
Most homeowners find that 6x6 or 6x8 foot dimensions provide much more comfortable seating arrangements and better heat circulation. Remember that your interior dimensions will be smaller than the framed space due to insulation, vapor barrier, and interior paneling, adding approximately 3-4 inches to each wall thickness.
Proximity to water access enhances the traditional sauna experience. Cooling down between sessions is an integral part of sauna culture. Whether it's a nearby shower, an outdoor space for cooling, or even a dedicated cold plunge tub for home, consider how users will transition from the hot room to the cooling areas.
Determining Sauna Size and Capacity
Proper sizing ensures both comfortable use and efficient heating. The general rule is 2 feet of bench space per person for optimal capacity planning.
Popular luxury home sauna dimensions include:
- 4x6 feet for couples
- 6x8 feet for small families
- 8x10 feet for larger gatherings
The 6x8 configuration strikes an excellent balance between space efficiency and comfort, allowing for proper bench arrangement while keeping heating costs reasonable.
Ceiling height recommendations typically fall between 7 and 8 feet for optimal heat circulation and user comfort. Lower ceilings can create a cramped feeling and poor air circulation, while excessive height can waste energy.
The impact of room size on heating costs becomes significant over time. A 6x6 foot sauna typically uses a 6-8 kW heater, while an 8x8 foot space might require 8-12 kW. This translates to operating costs ranging from $0.32 to $ 0.50 per hour for typical sessions.
Should You Choose a Sauna Kit or Custom Build?
The decision between sauna kits and custom builds is one of the most crucial choices in your project. Each approach offers distinct advantages depending on your situation, budget, and construction experience.
Sauna Kit Advantages
Pre-cut sauna kits typically cost $3,000 to $12,000 and can be assembled in 14 to 20 hours by beginners following detailed instructions. These kits include pre-sorted materials, all necessary hardware, and step-by-step assembly guides that significantly reduce complexity.
Most reputable kit manufacturers offer technical support throughout the assembly process and provide warranty coverage for materials and components. The best home sauna brands 2026 offer engineered components designed specifically for sauna use, pre-calculated material quantities that minimize waste, and instructions refined through thousands of installations.
The included hardware is specifically selected for high-temperature environments. The cutting is done with precision equipment that most DIYers don't have access to. Learning about sauna installation requirements helps you understand what kits provide versus what you'll need to arrange separately.
Custom Build Considerations
Custom builds offer potential savings of 30-40% compared to kits but require advanced carpentry skills and significant time investment. The cost savings come from purchasing materials directly, selecting your own wood grades, and handling all cutting and preparation work yourself.
This approach demands expertise in framing, electrical planning, and understanding of sauna-specific construction techniques. Custom builds make sense when you have unique space constraints that standard kit sizes can't accommodate, specific design requirements that aren't available in kit form, or sufficient construction experience to handle the technical challenges confidently.
Custom builds also work well when you want to integrate non-standard features like built-in sound systems, specialized lighting, or unique bench configurations.
What Materials Do You Need for Sauna Construction?
Building the best home saunas requires specific materials engineered to withstand high temperatures, humidity fluctuations, and repeated thermal cycling. Using standard construction materials can lead to warping, resin bleeding, off-gassing, and premature failure.
Wood Materials and Selection
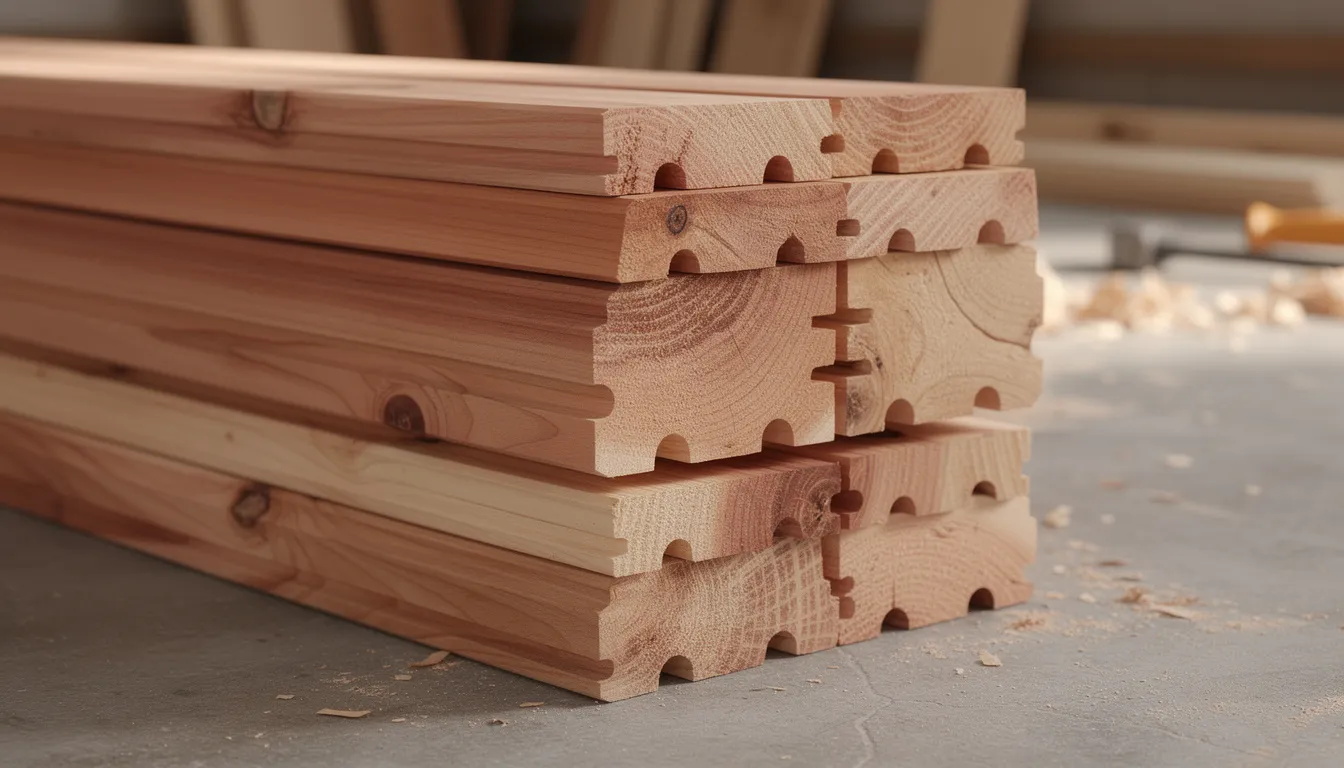
Western red cedar stands as the premium choice for sauna construction, commanding $8-12 per square foot but offering superior performance in high-heat environments. This species naturally resists moisture, insects, and decay while maintaining dimensional stability through repeated temperature cycles.
Its natural oils provide antimicrobial properties and the characteristic pleasant aroma that enhances the sauna experience. For the highest quality results, consider using clear cedar, a premium, knot-free grade especially for benches, lining, and framing.
Alternative woods include Canadian Hemlock at $5-8 per square foot and Nordic Spruce at $6-10 per square foot. Hemlock provides similar moisture resistance to cedar with a lighter color and minimal resin content. Nordic Spruce represents the traditional choice in Finnish saunas, offering authentic aesthetics and proven performance.
Lumber specifications require tongue-and-groove paneling for interior surfaces, typically available in 1x4 or 1x6 profiles with micro-beveled edges. The paneling should be kiln-dried to 6-8% moisture content for dimensional stability.
Calculating board feet needed requires measuring all interior surfaces including walls, ceiling, and bench components. For a 6x8 foot sauna with 7.5-foot ceilings, expect to need approximately 400-500 board feet of paneling, plus additional material for benches and trim. Add 10-15% waste factor to your calculations.
Insulation and Vapor Barrier Systems
Fiberglass batt insulation rated R-12 to R-15 for walls and ceiling provides the thermal performance necessary for efficient sauna operation. Higher R-values improve energy efficiency but require thicker wall framing.
Foil-faced vapor barrier installation over insulation prevents moisture infiltration that could lead to mold, rot, or structural damage. The vapor barrier must be installed with the foil facing the interior heated space, creating a radiant barrier that reflects heat back into the room.
All seams and penetrations must be sealed with aluminum tape to maintain barrier integrity. Use high-quality aluminum tape specifically designed for HVAC applications, as standard duct tape will fail in high-temperature environments.
Understanding proper sauna temperature and humidity levels helps you appreciate why vapor barriers are so critical to preventing moisture problems.
What Is the Step-by-Step Construction Process?
The construction process follows a logical sequence that builds upon each completed phase. Following best practices ensures your sauna room meets high standards for quality and safety.
Site Preparation and Framing
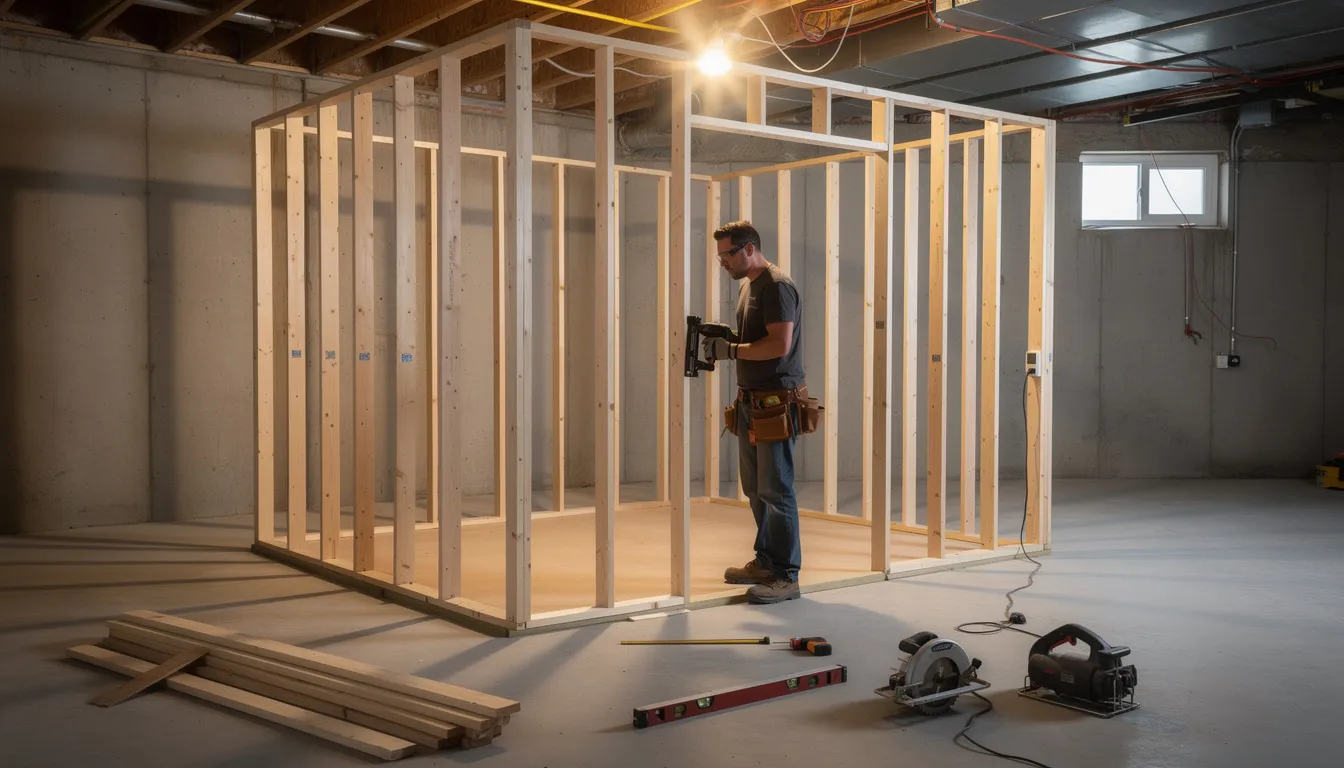
Clear and prepare the installation area by removing any existing finishes, fixtures, or furniture. If building in a basement, check for moisture issues and address them before beginning framing.
Test the concrete floor for level and make any necessary corrections. An uneven floor complicates bench construction and door installation. Install moisture barriers on concrete floors to protect against ground moisture and create a thermal break.
Frame walls with 2x4 studs at 16" on center spacing. Ensure all framing is plumb, level, and square, as irregularities will be magnified when installing the precision-milled paneling.
Create door rough opening with precise measurements to ensure proper door fit and operation. Standard sauna doors require a rough opening of 27.5" wide x 76.5" tall, though verify the requirements for your specific door before cutting.
Install blocking for bench supports and heater mounting to prevent future problems. Bench blocking should be positioned to align with your planned bench heights, typically at 18" and 32" from the finished floor level.
Electrical Installation
Running 220V circuits for electric heaters represents one of the most critical aspects of sauna construction. Most electric heaters in the 6-9 kW range require dedicated 30-40 amp circuits with appropriate wire gauge.
The circuit must originate at the main panel with a properly sized breaker and run directly to the heater location. Install thermostat control wiring during the rough-in phase to prevent the need to fish wires through finished walls later.
Most sauna heaters require low-voltage control wiring between the heater unit and a remote thermostat, plus a high-temperature sensor wire that mounts near the ceiling above the heater.
Low-voltage lighting circuit installation using 12V systems provides safe illumination in the high-humidity environment. Position light fixtures in corners away from direct heat and moisture exposure.
When to hire a licensed electrician versus attempting DIY electrical work depends on your experience level, local code requirements, and insurance considerations. Most jurisdictions require licensed electrician installation for high-amperage circuits.
The cost of professional electrical installation is typically a small fraction of total project cost and provides peace of mind regarding safety and code compliance. Understanding sauna safety guidelines emphasizes why professional electrical work matters.
Insulation and Vapor Barrier Installation
Install R-12 fiberglass batts between studs and joists, taking care to fill the cavity completely without compression. Cut batts slightly oversized so they fit snugly without gaps, but avoid overstuffing.
Proper vapor barrier placement with the shiny side facing the sauna interior creates both a moisture barrier and radiant heat reflector. The foil facing must be continuous and properly sealed to function effectively.
Seal all joints and penetrations with aluminum tape. Use high-quality foil tape designed for HVAC applications. Press tape firmly to ensure good adhesion, and consider using a J-roller to eliminate air bubbles.
Avoid compression of insulation for maximum effectiveness. Compressed insulation loses much of its thermal value and can create cold spots that lead to condensation problems.
Interior Cedar Paneling Installation
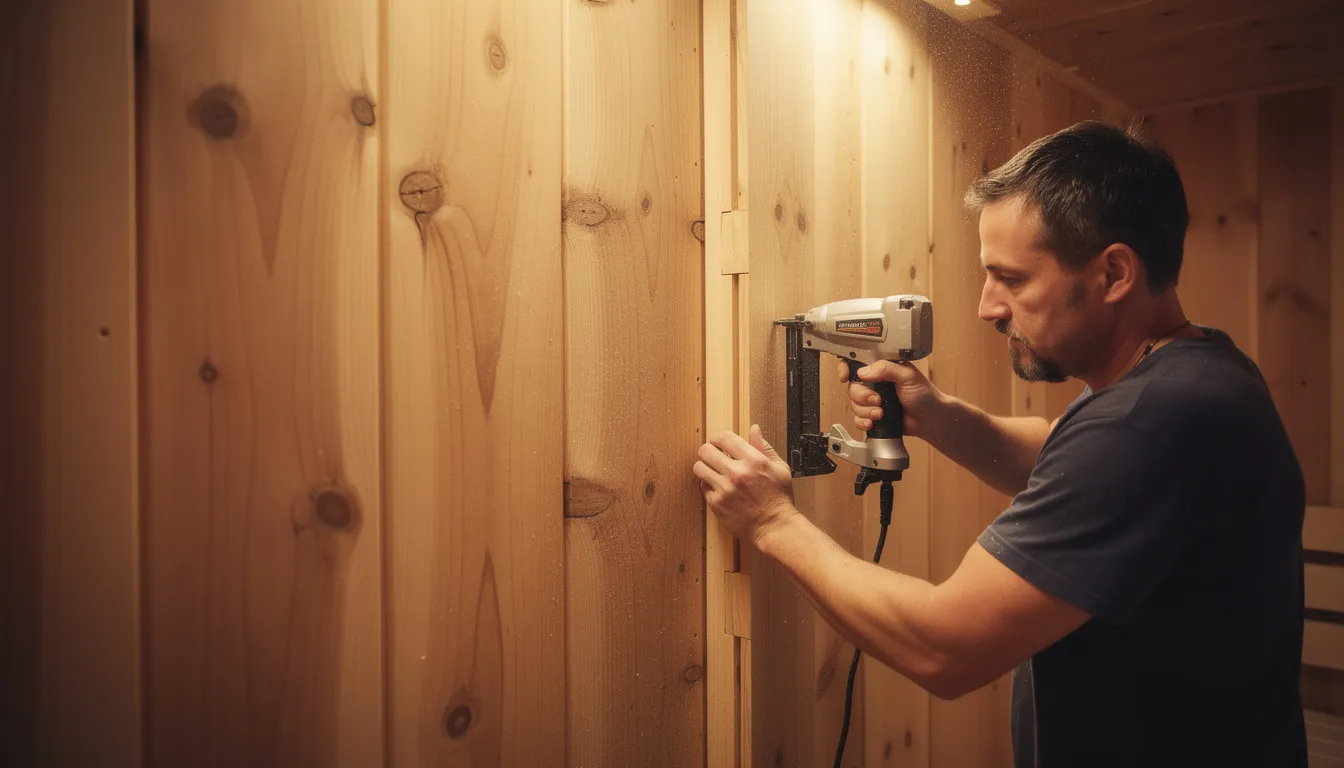
Start with ceiling installation and work toward walls. This allows the ceiling boards to extend slightly beyond the planned wall paneling line, creating a clean transition.
Install ceiling panels perpendicular to the joists using appropriate fasteners driven into solid framing members. For both ceiling and wall paneling, clear cedar is an excellent choice due to its premium appearance and durability.
Blind nailing through tongue to hide fasteners requires practice but creates a professional appearance. Drive finish nails at a 45-degree angle through the tongue at the base, ensuring they penetrate solid framing members.
Maintain 1/4" to 3/8" expansion gaps around perimeter to accommodate seasonal wood movement. These gaps will be covered by trim pieces, so they don't affect the finished appearance.
Cut around electrical boxes and heater locations with precise measurement and careful cutting. Use a jigsaw or coping saw for curved cuts, and test fit frequently.
Finish with trim pieces to cover expansion gaps. Use cedar trim that matches or complements your paneling.
How Do You Build Sauna Benches?
Build a 2-tier bench system with a top bench typically 20" deep and positioned closer to the ceiling to maximize heat exposure. The lower bench, usually 16" deep, provides comfortable seating for different temperature preferences.
Bench Construction Details
Frame construction using 2x4 cedar or pressure-treated lumber creates a sturdy foundation. Cedar framing offers moisture resistance and thermal properties, while pressure-treated lumber provides a more economical option for hidden structural components.
All framing must be properly fastened to wall studs or blocking to ensure stability under load.
Bench height, with the upper section at 32" and the lower section at 18" from the finished floor, provides optimal positioning relative to the heater and ceiling. This arrangement positions the upper bench in the hottest air layer, while maintaining adequate headroom.
Space bench boards 1/4" apart for air circulation. Gaps between boards are essential for both air circulation and drainage, ensuring the benches remain dry and comfortable.
Secure benches from underneath to avoid visible fasteners. Use carriage bolts or lag screws driven from below through the frame into the bench boards.
What Heater Should You Choose?
The sauna heater serves as the heart of your installation, determining both the quality of the sauna experience and ongoing operating costs. Proper heater selection requires careful consideration of room volume, electrical capacity, and personal preferences.
Electric Sauna Heaters
Sizing guide for electric heaters follows the rule of 1 kW per 45-50 cubic feet of sauna space. For a 6x8x7.5-foot sauna (360 cubic feet), a 7-8 kW heater provides appropriate capacity.
Popular models include the Sauna Craft CW series and Tylo Sense series, both offering proven reliability and comprehensive control options. Consider features like digital controls, remote operation, and programmable timers when comparing models.
Installation clearances of 6" from walls and 7" from ceiling ensure safe operation. Stone capacity typically ranges from 40-70 lbs. depending on heater size, with larger stone loads providing better heat retention.
The cost of electric sauna heaters ranges significantly, with some models starting at around $1,154 and reaching over $4,000. Operating costs range from $0.32 to $ 0.50 per hour for typical sessions, based on national average electricity rates.
Understanding the ‘infrared sauna vs traditional sauna’ differences helps you choose between different heating technologies for your specific needs.
Control Systems and Thermostats
Digital versus analog thermostat options offer different advantages. Digital controls typically provide more precise temperature control, programmable features, and easier operation.
Timer functions ranging from 15 minutes to 12 hours accommodate different usage patterns and provide automatic shutoff for safety. Remote control capabilities allow convenient operation from outside the hot room.
Temperature range settings of 140-200°F for most units accommodate different user preferences. Traditional Finnish saunas typically operate at 160-190°F, with periodic steam generated by throwing water on heated stones.
How Do You Ensure Proper Ventilation?
Proper ventilation ensures user safety, comfort, and optimal sauna performance while preventing moisture problems. Unlike steam rooms that seal completely, dry saunas require controlled air exchange.
Ventilation Requirements
A minimum of 6-8 air changes per hour ensures an adequate oxygen supply and optimal air quality. This translates to specific airflow volumes based on the size of your sauna.
Intake vent placement near the heater at floor level leverages the heater's natural convection currents to distribute fresh air evenly throughout the space. Size the inlet appropriately for your space, typically 50-80 square inches for residential installations.
The exhaust vent location on the opposite wall, below the upper bench, creates proper circulation patterns. Position the outlet vent in the lower third of the wall height to avoid pulling hot air from the ceiling area.
Vent sizing of 50-100 square inches, depending on sauna size, provides adequate airflow without creating excessive heat loss. Larger vents may be partially closed with adjustable dampers during cold weather.
What Safety and Code Considerations Should You Know?

Safety represents the most critical aspect of sauna construction. High temperatures, electrical systems, and enclosed spaces pose multiple potential hazards that require proper design and installation to address.
Building Code and Fire Safety
Building code requirements for saunas typically address electrical installation standards, structural loads, ventilation requirements, and fire safety measures. Electrical permits are almost universally required for 220V heater circuits.
Start the permit process early, as approval delays can significantly impact your project timeline. Fire safety measures begin with proper clearances around heaters and extend to material selection and the quality of electrical installations.
Install smoke detectors outside the sauna room, as high heat and humidity can cause false alarms if detectors are placed inside the hot room. Never store flammable materials near the heater or inside the sauna room.
Electrical safety standards require GFCI protection in many jurisdictions; however, some areas specifically prohibit GFCI protection for sauna heaters due to the potential for nuisance tripping. All electrical work should be performed by licensed electricians familiar with sauna requirements.
What Finishing Touches Complete Your Sauna?
The finishing touches transform your functional sauna room into an inviting retreat space. Quality accessories and thoughtful details make the difference between a basic hot room and a true wellness sanctuary.
Doors, Lighting, and Accessories
Door installation options include both glass and wood designs. Glass doors offer visual openness and allow for natural light, while wood doors provide traditional aesthetics and superior heat retention.
Tempered glass doors must be specifically rated for use in saunas. Ensure all doors swing outward for emergency egress and can be easily opened from the inside.
Lighting selection should emphasize recessed fixtures specifically designed for sauna environments. Consider multiple light zones with separate switching for flexibility.
Essential accessories include a reliable thermometer and hygrometer for monitoring temperature and humidity levels. A wooden bucket and ladle facilitate traditional steam creation, while a sand-filled hourglass timer helps users track the session length.
Optional upgrades can include sound systems designed for high-temperature environments, chromotherapy lighting systems, and aromatherapy dispensers. Exploring essential sauna accessories helps you understand what enhances the experience.
What Are the Operating Costs and Maintenance Needs?
Understanding ongoing costs helps justify the initial investment while identifying opportunities for energy savings. Most homeowners are surprised by the relatively low operating costs compared to the costs of commercial spa visits.
Energy Costs and Efficiency
Monthly operating cost calculations based on usage frequency provide realistic budget expectations. A family using their sauna 3-4 times per week for 15-20 minute sessions typically spends $15-25 monthly on electricity.
Energy-saving tips can reduce these costs by 20-30% through proper insulation and efficient heating practices. Comparison with spa memberships reveals significant long-term savings, with typical monthly sauna access costs ranging from $50 to $ 100.
A home sauna typically pays for itself within 3-5 years for regular users, offering the convenience of home access and complete privacy. ROI analysis for home value increase shows that well-built saunas typically add 60-80% of their construction cost to home resale value.
Maintenance Requirements
Regular maintenance ensures years of trouble-free operation. Daily cleaning routines should include wiping down benches and walls with a clean, damp cloth to remove sweat and oils.
Allow the sauna to cool completely and air-dry with the door open after each use. Weekly maintenance includes checking heater stones for deterioration, verifying temperature calibration, and thoroughly cleaning the interior.
Annual inspections should examine electrical connections, the condition of wood, and the function of the ventilation system. Look for signs of excessive moisture, wood movement, or degradation of electrical components.
Signs of problems include cracking or splitting wood, electrical issues such as inconsistent heating, and poor heating performance. When to replace sauna stones depends on usage frequency, but expect replacement every 2-3 years with regular use.
Learning about daily sauna use practices helps you establish sustainable maintenance routines.
Conclusion
Building a sauna in your home is a rewarding investment in both your health and your living space. Whether you opt for an indoor sauna, a backyard retreat, or a custom design, the possibilities are nearly endless.
With options ranging from traditional wood-burning saunas to modern infrared saunas and convenient DIY kits, there's a solution for every preference and budget. The key to success lies in thoughtful planning, choosing the right materials, ensuring proper ventilation, and selecting a heater that matches your desired temperature and usage style.
Ready to start your sauna project?
Understanding which sauna brands offer the best quality helps you make informed investment decisions.
Not only does a well-designed sauna provide stress relief and relaxation, but it also offers a space for connection, reflection, and rejuvenation. By following best practices for construction and maintenance, you can enjoy the soothing heat and health benefits of your own sauna for years to come.
For additional guidance, contact Home Sauna to discuss your specific project needs..
Frequently Asked Questions
How long does it take to build a sauna from scratch?
Building a sauna from scratch requires varying amounts of time, depending on your approach and experience level. Kit assembly typically requires 14-20 hours over 2-3 weekends for beginners, while custom builds can take 40-60 hours depending on complexity and skill level. Professional installation usually takes 1-3 days. The timeline extends significantly if you need to run new electrical circuits or modify existing structures, so factor in permit approval times and contractor schedules when planning your project. Your first sauna will take longer than if you've done it before, so don't rush through the learning process.
What permits are required to build a home sauna?
You'll need permits for building a home sauna in most areas, though requirements vary by jurisdiction. Most places require electrical permits for the installation of 220V circuits, and building permits may be necessary for structural modifications or new construction. Some areas classify saunas as accessory structures requiring specific approvals. Contact your local building department early in the planning process to understand specific requirements in your area, as permit requirements vary significantly between different municipalities. Getting permits might seem like a hassle, but they protect you by ensuring your installation meets safety standards and won't cause problems with insurance or home sales later.
Can I install a sauna in my basement?
You can absolutely install a sauna in your basement with proper moisture control measures in place. Basements are excellent locations for saunas, offering natural privacy and stable temperatures that enhance the overall experience. Ensure an adequate ceiling height of at least 7 feet and proper ventilation to prevent humidity issues. Waterproof flooring is essential to prevent moisture damage, and you may need a dehumidification system in humid climates. The concrete floor in most basements provides an ideal foundation that can be easily sealed and protected. Ensure that you address any existing moisture issues before building, as trapping moisture behind your sauna can lead to serious long-term problems.
How much does it cost to run a home sauna monthly?
Running a home sauna monthly costs surprisingly little for regular users. The average usage of 3-4 sessions per week, each lasting 15-20 minutes, costs approximately $15-25 monthly, based on national average electricity rates of $0.12-0.15 per kWh. Smaller saunas cost about half as much to operate as larger units, and proper insulation can reduce operating costs by 20-30%. These costs compare very favorably to commercial spa memberships, which typically cost $50-$ 100 per month for unlimited sauna access. Over time, your home sauna essentially pays for itself, providing the convenience of use whenever you want, without leaving your house.
What's the difference between infrared saunas and traditional saunas for DIY building?
The primary difference between infrared saunas and traditional saunas for DIY building lies in their heating methods, temperature ranges, and installation complexities. Traditional saunas require stone-filled heaters and operate at higher temperatures of 160-200°F, while the best infrared saunas use wall-mounted panels with lower temperatures of 120-140°F. Traditional saunas require more robust insulation and vapor barriers due to their higher temperatures and steam usage. Infrared installations are simpler with plug-in panels versus hardwired heaters, but the traditional sauna experience with heated stones and steam cannot be replicated with infrared technology. Your choice depends on whether you want the classic Finnish experience or the gentler heat of infrared therapy.