
Infrared emitters power many of the safety and detection systems we rely on daily—from garage door photo-eyes to automatic soap dispensers to home sauna wellness devices. And when cleaning and realignment no longer solve intermittent errors, replacing the emitter itself often restores reliable operation.
This guide covers everything you need to know before replacing infrared emitters and how to do so effectively, step by step. You’ll also learn when to do it and how to diagnose failing infrared emitters.
Key Takeaways
- Most modern IR emitters are 5 mm LEDs operating in the 850–950 nm wavelength range, and choosing the correct wavelength, beam angle, and drive current is critical to avoid false positives and negatives in your sensor system.
- Many frustrating "sensor problems" are actually emitter issues in disguise—weakened LEDs, poor alignment, or damaged wiring can break the invisible loop between emitter and detector, causing unpredictable behavior.
- Careful diagnostics with a multimeter, smartphone camera, and test resistors should precede a full replacement to save money and prevent unnecessary part swaps.
- HomeSaunas prioritizes robust, low-EMF infrared emitters designed for thousands of hours of consistent output—because quality components make the difference in long-term reliability.
What Do Infrared Emitters Do? And Why Do They Fail?
Infrared emitters are the invisible workhorses behind countless everyday devices. These components function as unseen light sources in safety sensors, remote controls, garage door photo-eyes, water level detectors, and infrared saunas.
Over time, they dim or drift out of alignment, causing intermittent errors that can be maddening to troubleshoot.
Garage door sensors are infrared photo-electric "eyes" that work in pairs, with one emitter and one receiver aligned to detect obstructions.
Understanding how these components fail—and how to replace them correctly—can save you time, money, and frustration while ensuring your devices operate reliably for years to come.
Understanding the IR Emitter Function
An IR emitter is typically an infrared LED that sends a focused beam to a receiver (usually a photodiode or phototransistor).
The system monitors that beam to detect objects, measure liquid levels, or sense motion—any interruption triggers a response.
Since the early 1990s, IR-based safety systems have become standard in household devices.
The 1993 U.S. mandate requiring garage door openers to include safety sensors accelerated this adoption, and today these sensors appear in everything from pet water fountains to automatic dispensers.
Common Failure Modes
Common failure modes include LED output loss after thousands of operating hours, thermal stress from heat buildup, power surges that damage the semiconductor junction, and contamination or mechanical misalignment that changes how the beam reaches the sensor.
Users often struggle to diagnose these issues, as sensor errors can result from subtle component failures or alignment issues.
In the sections ahead, you'll learn how to recognize emitter failure, choose the right replacement part based on wavelength and current requirements, and perform a careful swap using basic tools and techniques.
How Do Infrared Emitters and Receivers Work Together?
Emitters never operate in isolation. Every IR detection system pairs a specific LED with a matching receiver tuned to a particular wavelength and intensity range.
Understanding this relationship is essential before you attempt to replace infrared emitters in any device.
The Basic Loop
The basic loop works like this: the emitter sends a continuous or pulsed infrared beam across a gap or into a reflective surface.
When the receiver detects this light, its output current changes. The control board interprets that change as "clear path," "obstruction," or "liquid present."
Common Wavelengths
Common wavelengths include 850 nm, 880 nm, 940 nm, and 950 nm. Receivers have peak sensitivity around one of these bands, with 940 nm being especially common in consumer products manufactured between 2010 and 2026.
Beam Angle Matters
Beam angle matters significantly. Narrow angles (15°–20°) work best for precise detectors like photo-eyes and water depth sensors, while wider angles (40°–60°) provide coverage for motion sensors and proximity detectors.
The wrong angle can cause stray reflections and misreads. Many devices use low-voltage wiring (typically 5V–24V DC) and simple series resistors to set LED current in the 10–30 mA range.
This straightforward circuit design makes DIY repairs feasible for many hobbyists.
Where Should You Position Infrared Emitters in Home Saunas?
When designing your own best infrared sauna for home installation, the placement of infrared emitters is one of the most important factors for achieving effective, even heat distribution and a safe, comfortable sauna space.
Strategic panel placement ensures that infrared light reaches every area of the sauna, providing consistent warmth and maximizing the infrared sauna's health benefits.
Optimal Multi-Level Positioning
For optimal results, position infrared emitters at multiple levels—typically at the back, sides, front, and leg areas—so that the infrared light can envelop your body from every angle.
This 360° coverage helps eliminate cold spots and ensures that every cubic foot of your sauna receives adequate heat.
Pay close attention to the height of each emitter: placing panels at shoulder and back height targets the core, while lower panels warm the legs and feet.
Spacing Considerations
Spacing is also critical. Avoid clustering emitters too closely, which can create uncomfortable hot spots, or placing them too far apart, which may leave areas under-heated.
Proper panel placement along the side walls, back wall, and front wall, along with consideration of ceiling height, helps maintain a balanced temperature throughout the sauna.
Wiring for Optimal Performance
When wiring your infrared emitters, plan routes to minimize voltage drop, especially in larger sauna rooms or when using multiple panels.
Use appropriately gauged wires and keep runs as short as possible to ensure each emitter receives consistent power.
Always prioritize safety by keeping emitters away from high-moisture areas and ensuring that all components are securely mounted and protected from accidental contact.
By carefully selecting the right location for each infrared emitter, you'll create a sauna space that delivers even, soothing heat and a truly relaxing full-spectrum infrared sauna experience.
When Should You Replace an Infrared Emitter?
Before swapping any emitter, you should always try cleaning lenses and checking alignment.
However, recurring "dirty sensor" or "obstruction" warnings after basic care usually indicate a failing LED or an incompatible replacement from a previous repair attempt.
Telltale Symptoms
Telltale symptoms include intermittent detection after a few successful cycles, devices timing out while "waiting for sensor," or needing frequent resets despite visibly clean optics.
If the problem returns within a few seconds of clearing an error, the emitter is likely degrading.
Brightness-Related Errors
Brightness-related errors follow a pattern: an LED that's too bright results in false negatives (the system thinks no obstruction is present even when one is).
An LED that's too dim causes false positives (the system constantly "sees" something blocking the beam).
Pay attention to changes after any part swap. If a new emitter makes the detector suddenly unpredictable, the wavelength or output is likely incompatible—even if the LED physically fits the socket.
Repeated troubleshooting on the receiver side with no improvement is another strong sign that the emitter diode itself has degraded.
At this point, replacement becomes the logical next step.
How Do You Diagnose Infrared Emitter Problems?
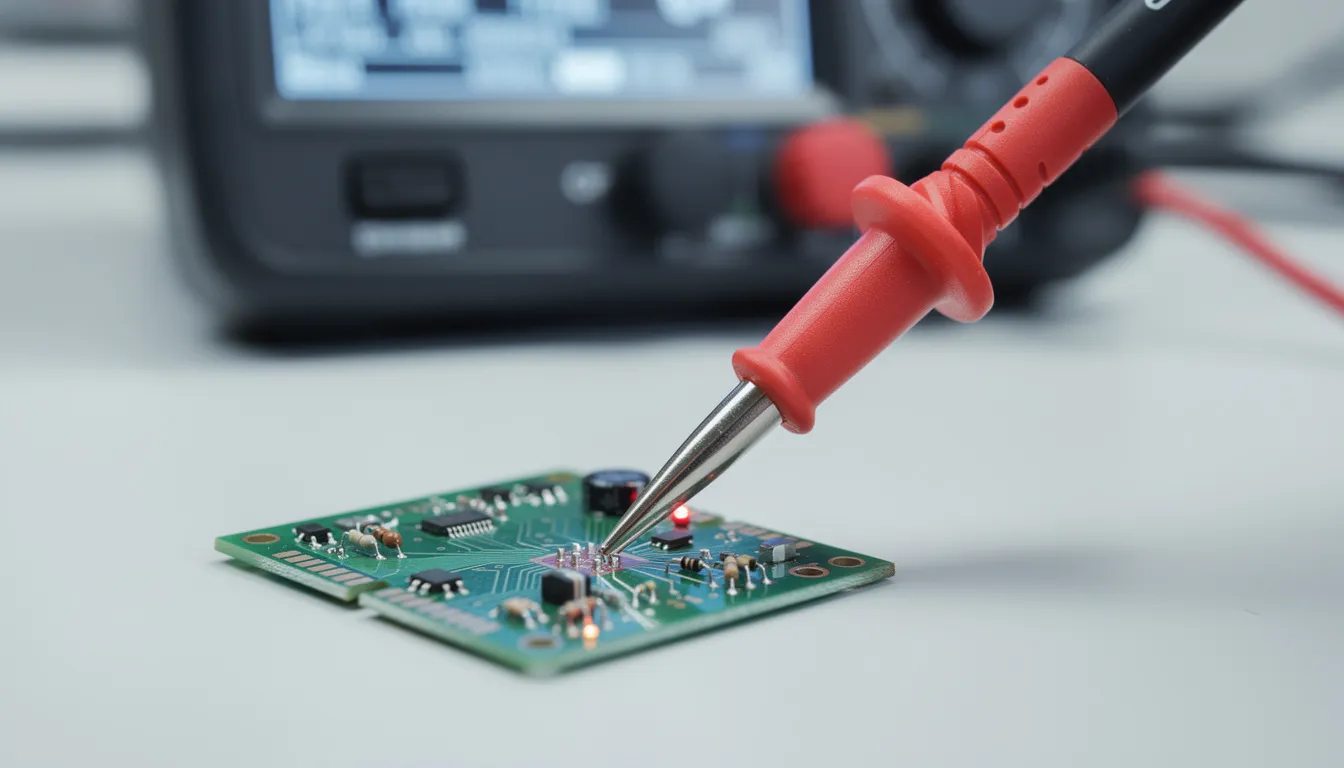
Systematic diagnosis avoids guesswork. With a basic multimeter, smartphone camera, and a few resistors, you can distinguish emitter issues from wiring faults or logic board problems before ordering any parts.
Use Your Smartphone Camera
Use a smartphone or digital camera to "see" IR light. Most phone cameras show active infrared LEDs as a faint purple or white glow.
Compare your suspect emitter to a known-good unit (like a TV remote). A very dim or absent glow suggests emitter failure.
Perform Continuity Checks
Perform a basic continuity check using your multimeter.
Verify that low-voltage power reaches the emitter leads and confirm continuity in the cable harness between the control board and the LED. This rules out broken wires.
Bench Test Procedure
For a quick bench test, connect the LED through a current-limiting resistor—220 ohms on a 5V power supply provides approximately 15–20 mA.
Community repair threads from 2020–2025 frequently reference this test setup for validating IR LEDs.
If the power and wiring tests are good but the LED output is unstable (bright on the first cycle, then fading or flickering under constant current), replacement is justified.
Don't continue troubleshooting other components when the emitter itself is clearly the problem.
What Are the Key Specifications for Replacement Emitters?
Not all infrared LEDs are interchangeable. You must match the wavelength, forward voltage, current, and beam geometry to your specific sensor system.
Choosing incorrectly often creates new errors that are even harder to diagnose.
Wavelength Matching
Wavelength matching is critical. Check device documentation or the original part number for specifications.
Typical consumer replacements include 940 nm high-output IR LEDs and 950 nm variants. Note that 950 nm LEDs are incompatible with some water sensors tuned to 940 nm.
Electrical Specifications
Electrical specifications to verify include forward voltage (typically 1.2–1.5V for IR diodes) and maximum current ratings (usually 20–40 mA). For longevity, stay at or below 20 mA unless the manufacturer specifies otherwise.
Beam Angle and Package Size
Beam angle and package size affect detection reliability.
Common 5 mm through-hole packages with narrow 15° angles are recommended for focused beams in photo-eye or water depth sensors.
Hobbyists and repair communities have consistently recommended these for precision applications from 2018 to 2024.
Matched emitter/receiver pairs from the same vendor—or salvaged from identical donor units—often perform better than random LED substitutions.
This is especially true for tightly tuned water-level and liquid-detection sensors.
Specification Reference Table
|
Specification |
Typical Range |
Notes |
|
Wavelength |
850–950 nm |
Match to receiver sensitivity |
|
Forward Voltage |
1.2–1.5V |
Check datasheet |
|
Max Current |
20–40 mA |
Stay ≤20 mA for longevity |
|
Beam Angle |
15°–60° |
Narrow for precision sensors |
|
Package |
5 mm through-hole |
Most common replacement type |
What Is the Step-by-Step Replacement Process?
This section provides a practical, step-by-step guide focused on typical small-appliance or sensor board applications—water-level sensors, automatic dispensers, photo-eyes, and similar devices that use 5 mm IR LED emitters.
Step 1: Disconnect All Power Sources
Unplug the device or switch off the breaker. For low-voltage boards, disconnect any plug-in transformer. This prevents short circuits and accidental motor or valve movement during your repair.
Note: When replacing garage door sensors, always disconnect the power supply before starting.
Step 2: Document Wiring with Clear Photos
Label wires by color and function before disassembly. Common conventions from repair threads (2015–2025) include red for +V, blue for return, and gray for signal lines. You'll thank yourself during reassembly.
Note: When replacing garage door sensors, label the sensor wires to avoid confusion during reinstallation.
Step 3: Access the Emitter Assembly
Open the box (the main housing or enclosure) to access the emitter assembly. LEDs may be buried in potting compounds like bitumen or hot glue.
Gently pry or push the original LED into the housing for removal. Work carefully to avoid damaging the PCB.
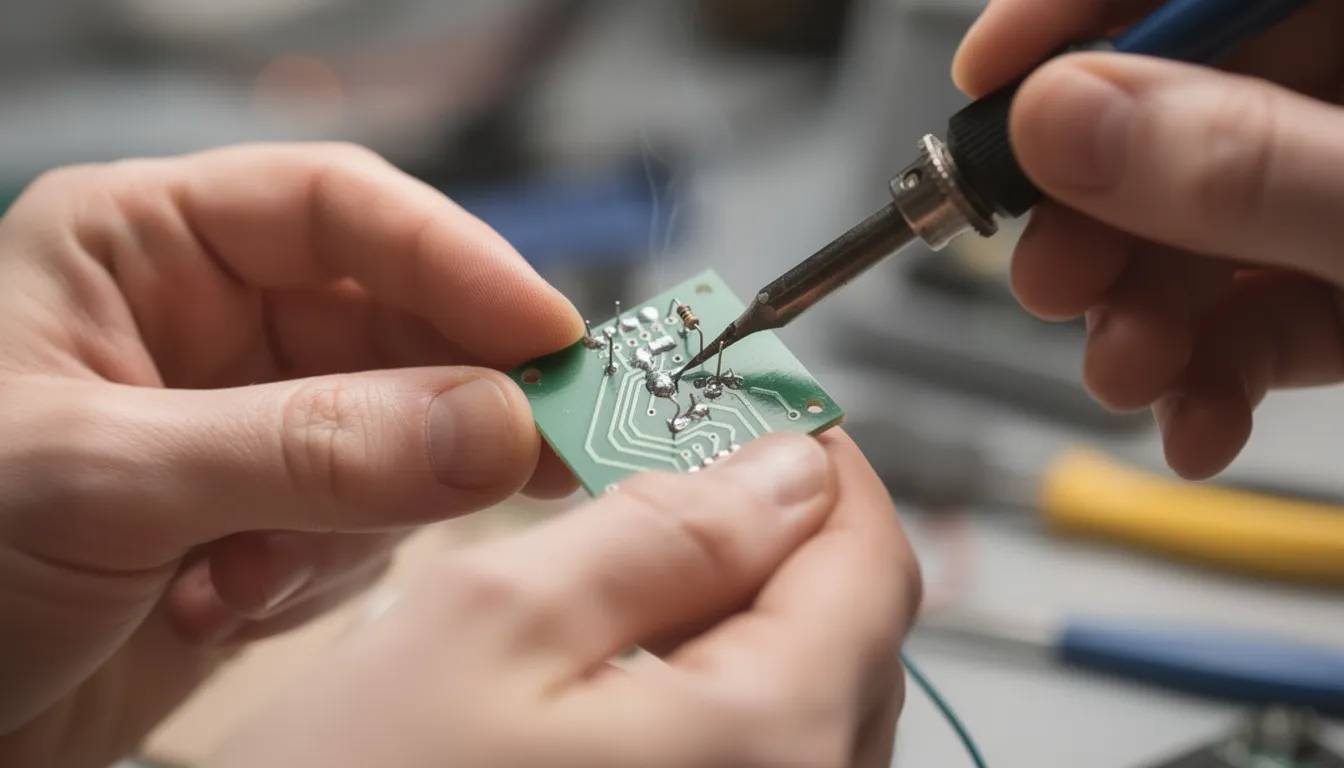
Step 4: Desolder the Old LED
Desolder the old LED from the small PCB using a fine-tip soldering iron. Work in tight spaces with patience. Avoid overheating pads, and keep track of polarity—the flat edge or shorter lead indicates the cathode.
Step 5: Prepare and Solder the New LED with correct polarity
Optionally add heat shrink over exposed leads. Secure the LED body with high-temperature-safe hot glue or silicone to prevent vibration-induced failures over time.
Step 6: Add Series Resistor
Add a series resistor if brightness adjustment is needed. Start with approximately 1 kΩ, optionally adding a 1 kΩ trimmer potentiometer in series for fine-tuning.
Users have successfully tuned between 1.3 kΩ and 1.8 kΩ to balance false positives and negatives.
Step 7: Reassemble and Test
Ensure the emitter is properly installed in the box. Run device diagnostics or built-in test modes where available.
Monitor for stable readings over multiple full cycles before considering the repair complete. A DIY replacement of garage door sensors typically costs between $25 and $80, while a professional replacement can cost between $120 and $230.
How Do You Fine-Tune IR Brightness for Reliable Detection?
In some sensors—especially water-detection or reflective-optical sensors—simply getting the LED to light isn't enough. Output must sit within a narrow window where the receiver can clearly distinguish between "present" and "absent" states.
Progressive Dimming Method
Use multiple 220 ohm resistors in series to progressively dim a too-bright LED during testing. Observe at which total resistance errors shift from false negatives to false positives. This reveals your target operating range.
Real-World Tuning Behavior
Real-world tuning behavior follows a pattern: at very low resistance (0–220 ohms), users report several successful cycles followed by "no liquid detected" errors. At high resistance (around 2.2 kΩ), systems misfire with constant "sensor blocked" warnings.
Combined Approach
A combined approach works best: first add a fixed resistor (1 kΩ), then add a small trimmer potentiometer (1 kΩ) in series.
Dial in optimal detection while running test cycles over several days to confirm stability.
For non-electrical brightness control when electronics are fixed in place, cover part of the LED lens or light guide with black electrical tape.
Using insulating materials, such as heat shrink tubing or black tape, can help insulate the LED and manage heat while preventing stray reflections inside compact sensor housings without modifying the circuit.
What Are Common Pitfalls When Replacing Infrared Emitters?
Many replacement attempts fail not because of poor soldering technique, but because of subtle specification mismatches or overlooked mechanical and optical factors.
Photodiode vs. Phototransistor Confusion
Using a photodiode where the circuit expects a phototransistor (or vice versa) on the receiver side can partially bias the sensor, producing constant "half-on" readings that confuse firmware logic.
Wavelength Mismatch Consequences
Swapping a 950 nm emitter into a circuit tuned for 940 nm can reduce receiver sensitivity enough to force you to overdrive the LED. This shortens its life and creates temperature-dependent instability.
Overcurrent Damage
Driving IR LEDs directly from 6V or 12V without adequate resistance has been documented in hobbyist repairs, where emitters burned out instantly when tested on bench power supplies. Always calculate and include appropriate series resistance.
Over-Reliance on Camera Checks
A smartphone camera test shows whether an LED emits light, but it doesn't measure whether the output level is correct for your receiver. Always combine visual checks with functional tests (sensor response, fill times, safety reversals) during real operation.
How Do You Integrate Infrared Emitters with Control Systems?
A reliable control system is the backbone of any high-performing DIY best infrared sauna for home installation.
Integrating your infrared emitters with a digital controller lets you precisely manage temperature, session duration, and overall power supply, ensuring safety and comfort every time you use your sauna.
Selecting the Right Control System
Start by selecting a control system that matches the power requirements of your infrared emitters and is compatible with your sauna's total wattage.
A digital controller gives you the flexibility to adjust heat output, set timers, and monitor temperature in real time, making it easy to customize each session to your preferences.
Professional Installation
For safety and code compliance, it's highly recommended to have a licensed electrician install the control system, especially when working with mains power or complex wiring.
Proper installation ensures that all connections are secure, the power supply is stable, and the system includes essential safety features like emergency shutoff and overheat protection.
Manufacturer Guidelines
When integrating the control system, make sure each infrared emitter is connected according to the manufacturer's guidelines.
This not only protects your investment but also ensures your indoor 2-person infrared sauna cabin operates efficiently and safely.
A well-designed control system will also help extend the life of your infrared emitters by preventing overheating and allowing for gentle, controlled warm-up and cool-down cycles.
By thoughtfully integrating your infrared emitters with a robust control system, you'll enjoy a safer, more enjoyable, and longer-lasting DIY infrared sauna experience.
What Role Do Infrared Emitters Play in Home Wellness Devices?

While many people think of IR emitters as tiny safety components in appliances, they're also the core technology behind larger wellness systems. At HomeSaunas, we build full-spectrum infrared saunas around these same fundamental principles—just at a larger scale.
Planning Your Sauna Installation
When planning a sauna, it's important to choose the right room for home sauna installation. Consider the room's dimensions, ventilation, and layout to ensure optimal sauna performance and safety.
Pay special attention to the floor and frame construction, as a sturdy frame and properly insulated floor are essential for supporting the sauna structure and maintaining heat.
Quality Infrared Sauna Heaters
Our infrared sauna health benefits systems use arrays of low-EMF heating elements designed to produce consistent far- and near-infrared output across thousands of hours. This engineering reduces the need for early emitter replacement and maintains therapeutic effectiveness.
Moisture Control and Materials
For effective moisture control and heat retention, always install a vapor barrier and insulation during sauna construction. Western Red Canadian Cedar is recommended for sauna construction due to its beauty and low toxicity. Proper ventilation and moisture control are essential in sauna construction to protect the wood and ensure a safe, comfortable environment.
Manufacturer-Approved Replacements
When replacing damaged or degraded emitters in premium wellness gear—indoor saunas, sauna blankets, and red light panels—always use manufacturer-approved modules rather than generic LED lights. This maintains spectrum accuracy, EMF performance, and safety certifications.
DIY Sauna Considerations
Homeowners planning a DIY infrared sauna or adding sauna red light therapy kit panels in 2026 should specify high-quality 850–940 nm emitters and appropriate drivers.
For 120V/240V installations, consider working with a licensed electrician to ensure your power requirements and control systems meet code.
If you're unsure whether a heat issue, uneven panel output, or digital controller error in your own infrared sauna is due to an emitter problem or another system component, our team at HomeSaunas can help diagnose the issue remotely before you start disassembly.
How Do You Upgrade with Red Light Therapy?
Enhancing your best home infrared sauna with red light therapy is a powerful way to expand the health benefits and versatility of your home sauna wellness space.
Red light therapy, typically delivered via LED lights with a wavelength around 660nm, can be seamlessly integrated into your existing infrared sauna setup to create a full-spectrum experience.
Adding Red Light Panels
To add red light therapy, consider installing dedicated LED panels or upgrading your current infrared emitters to models that combine infrared and red light.
When planning your upgrade, review the power requirements of the new LED lights and ensure your control system and power supply can handle the additional load without compromising safety or performance.
Integrated Control Systems
Integrating red light therapy into your sauna's control system allows you to manage both infrared and red light sessions from a single digital controller.
This makes it easy to customize your wellness routine, whether you want to use infrared heat, red light therapy, or both simultaneously.
Always follow the manufacturer's installation instructions and safety guidelines to prevent electrical hazards and ensure optimal performance.
By adding sauna red light therapy kit components to your DIY infrared sauna, you can create a unique, spa-like environment that supports relaxation, skin health, and overall wellbeing.
With careful planning and attention to power and safety considerations, upgrading your sauna with red light therapy is a rewarding project that can elevate your luxury home sauna experience.
What Maintenance Tips Extend the Life of an Infrared Emitter?
With simple preventive care, IR emitters in sensors and wellness devices can last many years before dimming enough to require replacement.
Clean Regularly
Wipe lenses, light guides, and covers monthly or quarterly using a soft cloth and mild cleaner. Buildup that blocks light forces higher drive currents to compensate, accelerating LED degradation.
Manage Heat
Keep emitters away from sustained overheating. Ensure vents are clear in control housings, avoid enclosing LEDs in thick, non-vented glue, and respect the manufacturer's rated duty cycles where specified.
Perform Occasional Self-Tests
Trigger safety beams, run water-level diagnostics, or check sauna panel uniformity annually. Catching early deterioration prevents unexpected device shutdowns.
Use Surge Protection
Power surges damage both control boards and emitters. For appliances with electromechanical valves, avoiding hot water feeds (where specified) reduces thermal and electrical stress on sensitive electronics.
When Should You Choose DIY vs Professional Help?
Some emitter swaps are straightforward weekend projects. Others involve tightly integrated systems where professional service is the safer choice.
DIY-Friendly Situations
DIY-friendly situations include:
- Clearly labeled low-voltage boards (5V–24V DC)
- Through-hole 5 mm LEDs with accessible solder points
- Published schematics or community repair guides from 2015–2025
- Non-safety-critical applications like decorative lighting or convenience features
Professional Service Recommended
Professional service is recommended for:
- Sealed modules without user-accessible components
- Warranty-covered wellness equipment
- Mains-powered (120V/240V) sauna heaters and heating element arrays
- Devices where failure risks include flooding, fire, or safety-system bypass
For high-end equipment like HomeSaunas' best infrared sauna for home cabins and cold plunge tub for home control systems, contacting our support team for approved parts and procedures preserves both safety and performance.
The small cost of correct components and expert labor often outweighs the risk of recurring errors, damaged control boards, or voided warranties from improvised repairs.
Conclusion: Getting Infrared Emitter Replacement Right
Successful emitter replacement depends on three things: accurate diagnosis, correct wavelength and current matching, and careful physical installation with appropriate tuning.
Many puzzling "sensor errors" boil down to underperforming or mismatched emitters. A well-chosen 940 nm LED with the right series resistor can restore stable operation for months or years.
For safety-critical systems, test thoroughly over multiple cycles after any emitter swap. Watch for timeouts, misreads, or thermal drift that might indicate remaining issues.
If you're building or upgrading a home sauna or a sauna red light therapy kit, prioritize high-quality IR emitters and low-EMF designs from the start.
HomeSaunas is here to help with guidance on sauna panels, sauna door sensors, and add red light therapy modules whenever you need support.
FAQs
How do I know what wavelength my original infrared emitter used?
The easiest method is to find the part number printed on the LED or PCB and look it up in the manufacturer's service manual or online database. Many datasheets from 2005–2025 clearly list the peak wavelength (e.g., 940 nm). If markings are missing, search by device brand and model plus "IR LED wavelength." Community repair threads often document successful replacement parts for popular products. When no information is available, starting with a 940 nm emitter is reasonable—it's a common consumer standard. However, test carefully for stability and detection margins before considering the repair complete.
Can I replace an infrared emitter with a visible LED for testing?
Visible LEDs can verify basic circuit continuity and correct polarity, but the receiver in most IR systems is blind or has very low sensitivity to visible light. The device won't function normally with a visible substitute. Use visible LEDs only as a temporary diagnostic tool on the bench. Install a proper IR emitter with the correct wavelength and current rating for actual operation. Be aware that some cameras may saturate with visible light, leading to misleading relative brightness comparisons with IR output.
Is it safe to look directly at an infrared emitter?
Low-power emitters in household sensors and remote controls are generally considered safe. However, because infrared light is invisible, you cannot gauge intensity by eye—extended close-up exposure is not recommended. Avoid staring closely into high-output IR sources, especially those used in security cameras or specialized illumination. Follow manufacturer safety warnings for wellness and therapy devices. When working around stronger near-infrared or sauna red light therapy kit panels used in home sauna wellness setups, proper eyewear and appropriate distance are important.
Why did my new infrared emitter work for a few days and then start failing again?
Repeated early failures often point to an underlying issue: overcurrent from an undersized series resistor, excessive heat, an unstable power supply, or a receiver that's partially failing alongside the emitter. Measure LED current under normal operation and confirm it stays within the datasheet limit (often 20–30 mA). Verify the LED isn't buried in insulating glue that traps heat and accelerates degradation. If current and temperature are within range but errors recur, the logic board or sensor side may be degrading. Professional diagnosis or board-level repair might be necessary.
Can I swap just one emitter in a multi-emitter array, like in an infrared sauna panel?
In high-density arrays such as some sauna heaters or light panels, mixing old and new emitters can create uneven output and potential hot spots. Many manufacturers don't recommend partial replacements. Check your product documentation. Some arrays are designed for modular replacement of whole panels rather than individual emitters, preserving spectral and thermal characteristics.
References
- U.S. Consumer Product Safety Commission –. "CPSC Announces Final Garage Door Opener Safety Standard."
- Sun Home Saunas – “Infrared Saunas 101: Health Benefits, Safety Tips, and Models.”
- Reddit Ask Electronics – "IR LED Testing and Replacement Community Threads."
- Arduino Forum "Infrared Sensor and Emitter Discussions."