
Building a home sauna is one of the most rewarding projects you can undertake, but unlike typical room additions, saunas subject walls, ceilings, and floors to intense heat and dramatic humidity swings that would destroy ordinary construction within a few years. The difference between a sauna lasting 25 years and one rotting from the inside out in five comes down to proper waterproofing and insulation from the start.
This comprehensive guide walks you through proven strategies for creating a moisture-resistant, energy-efficient sauna that performs flawlessly for years to come. You'll learn why mineral wool outperforms other insulation options, how aluminum foil vapor barriers protect your structure, and where most builders make costly mistakes that lead to mold and rot.
Whether you're converting a basement corner, building a luxury home sauna retreat, or constructing a dedicated outdoor structure, the core principles remain constant. Master these fundamentals, and you'll create a wellness space that delivers authentic benefits without hidden moisture problems threatening your investment.
Key Takeaways
- A home sauna must be treated like a high-temperature wet room: continuous waterproofing on wet-side surfaces plus a correctly detailed vapor barrier behind cladding keeps moisture out of your structure
- Mineral wool (such as Rockwool) paired with an aluminum foil vapor barrier is the safest, most temperature-stable insulation system for most indoor and outdoor sauna projects
- Floors and ceilings are critical heat loss points: use rigid foam over concrete slabs and extra insulation (R-22 to R-30) in ceilings, fully sealed with foil
- Good ventilation and a drying strategy (adjustable vents, "bake and dry" routine) are as important as waterproofing to prevent mold and structural damage
- Documentation before closing up walls—photos of insulation, foil seams, and drain connections—saves major headaches when troubleshooting problems years later
What Planning Strategy Should You Follow?
Before purchasing materials, you need to understand the three main moisture risks you're defending against.
Understanding Moisture Threats
Bulk water: Splashing from ladling water onto hot stones, hose-down cleaning, and condensation dripping from the ceiling
Water vapor: Steam and humid air generated during sauna bathing that penetrates any gap it can find
Condensation in wall cavities: Warm, moist air hits cold surfaces inside walls and ceilings in cold climates, creating hidden water problems
The difference between "waterproofing" and "vapor control" confuses many first-time builders. Waterproofing refers to the application of membranes and sealants on the room side of floors and splash zones—surfaces that may be exposed to liquid water.
Vapor control refers to the foil barriers and air sealing behind your wood paneling, which prevent humid air from migrating into insulation cavities where it condenses and causes rot.
Strategy Overview for Your Build
- Treat the sauna as a sealed hot room with a continuous aluminum foil vapor barrier on the interior side
- Apply robust waterproofing only where liquid water is expected (floors, lower walls near stove, tile areas)
- Allow the exterior side of walls to dry through breathable housewrap and ventilated cladding
- Size insulation for your climate—thicker in cold regions, adequate in temperate zones
- Plan ventilation from day one: air intake low, exhaust high, both adjustable
Understanding proper sauna ventilation complements your waterproofing strategy perfectly.
What Insulation Materials Work Best?
High temperatures—often 150-195°F (65-90°C) at the ceiling—and extreme humidity render many typical home insulation products ineffective.
Mineral Wool: Primary Recommendation
Mineral wool (brands like Rockwool Comfortbatt or Roxul) is the best insulation for most sauna walls and ceilings. With a melting point around 2150°F, it handles sauna heat without breaking a sweat. It's non-combustible, naturally moisture-resistant, and maintains its R-value even when exposed to humidity—a critical advantage.
Mineral wool cuts easily with a serrated knife, friction-fits into 2×4 or 2×6 stud bays, and provides excellent soundproofing if your sauna shares wall with living space. The material costs 20-30% more than fiberglass, but specialists consistently recommend it for builds that require durability.
Rigid Foam Board for Floors
Rigid foam insulation—such as XPS (extruded polystyrene) or polyiso boards—delivers a superior R-value per inch, making it ideal for tight spaces like floors over concrete slabs. A 1.5-inch layer of XPS provides roughly R-7.5, enough to create a meaningful thermal break.
Use rigid foam on the exterior side of walls or beneath floors, but keep it out of the hot interior of the room. These materials have temperature limits and can soften when exposed directly to radiant heat near your heater.
Spray Foam: Proceed with Caution
Spray foam insulation frequently appears in online discussions, but it poses real risks in high-temperature applications. Most closed-cell spray foam products are rated for maximum service temperatures around 180°F—right at or below typical sauna operating temperatures near the ceiling.
Beyond temperature limits, spray foam raises concern about off-gassing at elevated temperatures, making future inspections nearly impossible. For walls and ceilings inside the hot room, mineral wool is the best solution.
Fiberglass Batts: Acceptable with Perfect Vapor Control
Fiberglass insulation has been used in North American saunas for decades. It's inexpensive, widely available, and provides good R-value when properly installed. The catch? Fiberglass absorbs moisture over time, and wet fiberglass loses much of its insulating ability while potentially harboring mold.
If you choose fiberglass, pair it with a flawless aluminum foil vapor barrier with zero gaps or tears. Mineral wool remains the safer choice for most builders.
Quick Reference for Placement
- Hot room walls and ceiling: Mineral wool (R-13 to R-23)
- Under concrete slab floors: Rigid XPS or polyiso (R-7.5 to R-10)
- Exterior wall sheathing: Additional rigid foam layer for cold climates
- Avoid inside hot room: Spray foam, untreated polystyrene, low-temperature foams
How Do You Waterproof and Insulate Walls?
Walls are where most moisture damage occurs in a home sauna installation. Steam rises during use, hits cooler surfaces, and will find any gap in your vapor barrier to infiltrate insulation and framing.
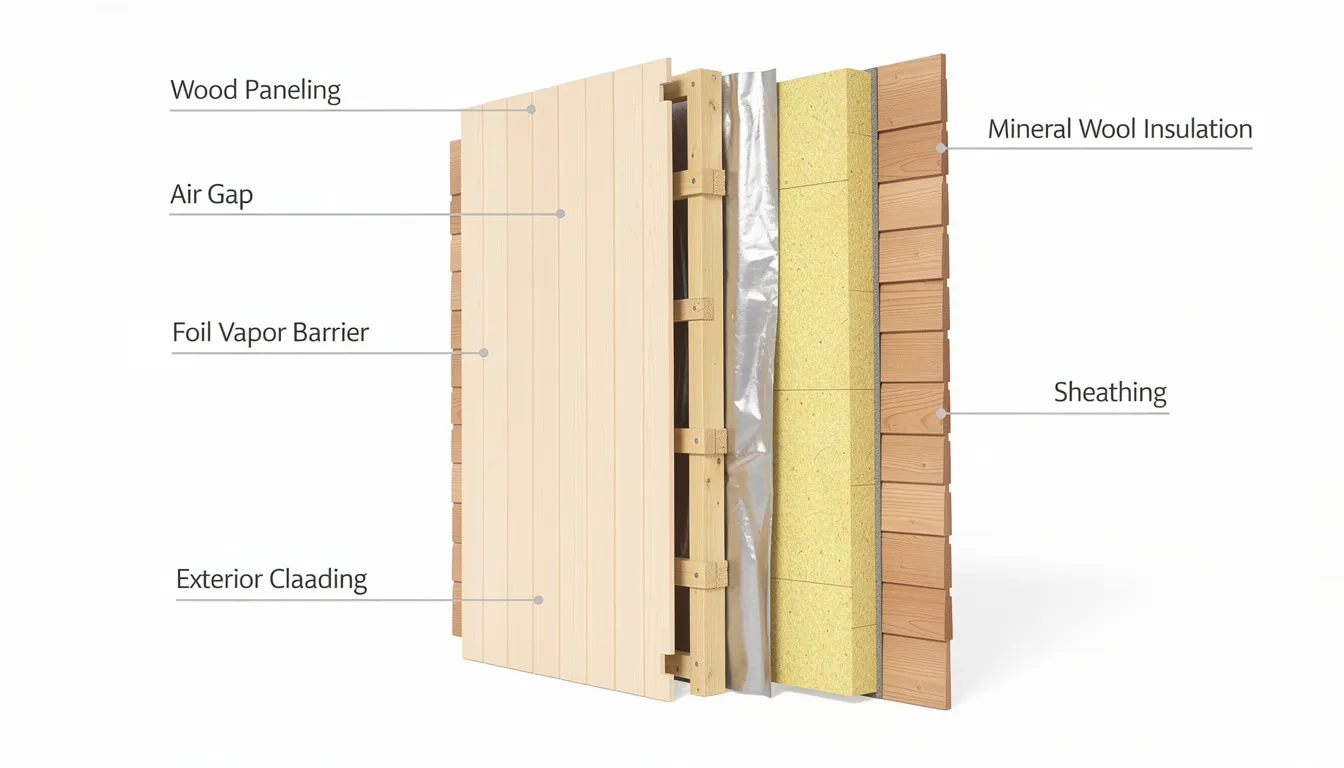
Typical Wall Assembly Layers
A typical indoor sauna walls builds up in layers from the inside out:
- Tongue-and-groove cedar, spruce, or thermo-aspen paneling
- Air gap created by furring strips (optional but recommended)
- Aluminum foil vapor barrier with all seams taped
- Unfaced mineral wool filling the full depth of stud bays
- Exterior sheathing (plywood or OSB)
- Weather barrier (Tyvek or similar housewrap)
- Exterior cladding with a ventilated air space
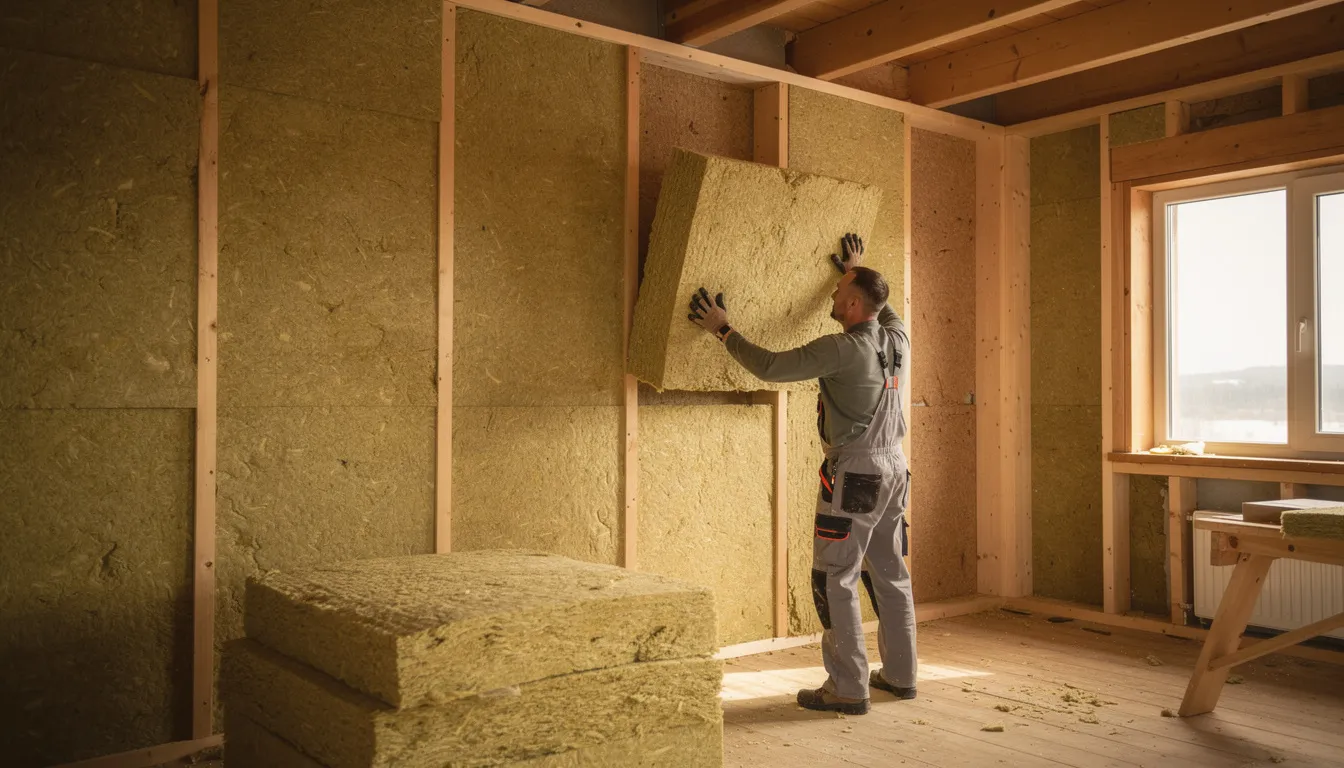
Installing Mineral Wool Properly
Cut mineral wool batts slightly oversize—about 1/2 inch wider than the stud cavity—to create a friction fit that holds the insulation in place without the need for fasteners. Fill the full depth of your studs, whether 2×4 (3.5 inches) or 2×6 (5.5 inches).
Pay special attention to narrow cavities around windows, electrical boxes, and corners. Cut small pieces to fill every gap completely. Any void in your insulation layer becomes a path for heat escape and potential condensation. This applies equally to outdoor full-spectrum infrared sauna installations and traditional designs.
Aluminum Foil Vapor Barrier Installation
The aluminum foil vapor barrier is arguably the most critical component of your wall assembly. Run foil continuously across walls and up onto the ceiling, overlapping seams by at least 2 inches (many builders prefer 4-6 inches). Tape every seam with high-temperature aluminum foil tape rated for 200°F or higher.
Seal electrical boxes carefully using foil tape or specialized high-temperature gaskets. Cut the foil neatly around boxes rather than just poking holes through. Every penetration represents a potential moisture pathway that needs to be sealed.
Some builders use 6-mil polyethylene sheeting as a vapor barrier, which has a proven track record. However, aluminum foil offers two advantages: it reflects radiant heat back into the room (with a reflectivity of up to 97%), and it better tolerates temperature swings.
The "Breathing Walls" Consideration
Fully seal the hot room side with foil, and allow the exterior side to dry through vapor-permeable housewrap and ventilated cladding. Trying to let walls breathe from both sides in cold climates creates trapped moisture. Humid air from the hot sauna migrates into the wall cavity, hits cold sheathing, condenses, and has nowhere to go.
Special Cases: Basement and Exterior Walls
Concrete and masonry walls behave as cold, massive heat sinks that attract condensation if not properly insulated. A basement sauna built directly against a concrete wall will constantly fight against that thermal mass.
For basement concrete walls, follow this assembly:
- Apply 1-2 inches of rigid XPS or polyiso foam directly against concrete
- Build a 2×4 stud wall in front of the foam, leaving a small air gap
- Fill stud cavities with mineral wool insulation
- Install an aluminum foil vapor barrier on the hot room side
- Attach furring strips and then cedar paneling
Never apply foil or poly directly against cold concrete—this traps water between the moisture barrier and concrete, leading to mold and degradation.
How Do You Insulate Ceilings Properly?
Most heat loss in a sauna happens through the ceiling. Hot air rises, and without adequate ceiling insulation, your heater works harder than it needs to. Target R-22 to R-30 in ceiling assemblies—significantly more than the R-13 to R-15 typical in walls.
Optimal Framing and Installation
Frame sauna ceilings with 2×6 or 2×8 joists to accommodate deeper insulation. In colder regions, the extra insulation pays for itself quickly in reduced heating times and lower energy costs. Studies suggest well-insulated saunas can heat 30-50% faster than poorly insulated ones.
Fill joist cavities completely with mineral wool, ensuring full contact with the ceiling surface above and no gaps at edges or corners. Ceiling corners are notorious heat escape paths—take extra time here.
Continuous Vapor Barrier at Ceiling
The aluminum foil vapor barrier must transition seamlessly from walls across the ceiling with no gaps at the intersection. Drape foil over the ceiling joists or attach it from below to furring strips, then run the wall foil up to overlap the ceiling foil by at least 4 inches.
Seal around light fixtures, stove flue shields, and any vents penetrating the ceiling. The ceiling experiences the highest temperatures and humidity—any leak here can cause disproportionate damage.
Lighting Considerations
Use light fixtures rated for high temperature and high humidity (typically labeled for sauna or steam room use). Mount electrical boxes outside the foil layer when possible—above the ceiling plane in the joist space—and seal around the fixture housing to prevent moisture from entering.
Never use standard recessed can lights designed for living spaces. The warmth from the sauna will overheat the fixture and create a fire hazard.
How Do You Handle Sauna Floors?
Floors in home saunas are frequently neglected, leading to cold feet during bathing, moldy framing, and constant heat loss. Many first-time builders focus entirely on walls and ceiling while leaving the floor as an afterthought.
Floor Requirements by Type
|
Floor Type |
Primary Concern |
Key Strategy |
|
Concrete slab |
Cold surface acting as a heat sink |
Rigid foam thermal break + waterproof membrane |
|
Framed over the crawlspace |
Moisture from below, cold air |
Insulation with a ventilated air space |
|
Suspended over the living space |
Moisture protection for the room below |
Full insulation + vapor barrier + waterproof surface |
Concrete Slab Floors
For a basement sauna built on a concrete slab, follow this sequence:
- Grind and clean the concrete
- Apply liquid or sheet waterproofing membrane across the entire floor, extending 4-6 inches up the walls
- Install 1-2 inches of rigid XPS foam as a thermal break (R-7.5 to R-10)
- Cover with cement board or pressure-treated plywood as a subfloor
- Finish with slip-resistant tile or removable cedar duckboards
The rigid foam layer is critical. Without it, the concrete acts as an infinite heat sink, continuously pulling warmth out. Your feet will feel cold even when the air temperature reads 180°F at bench height.
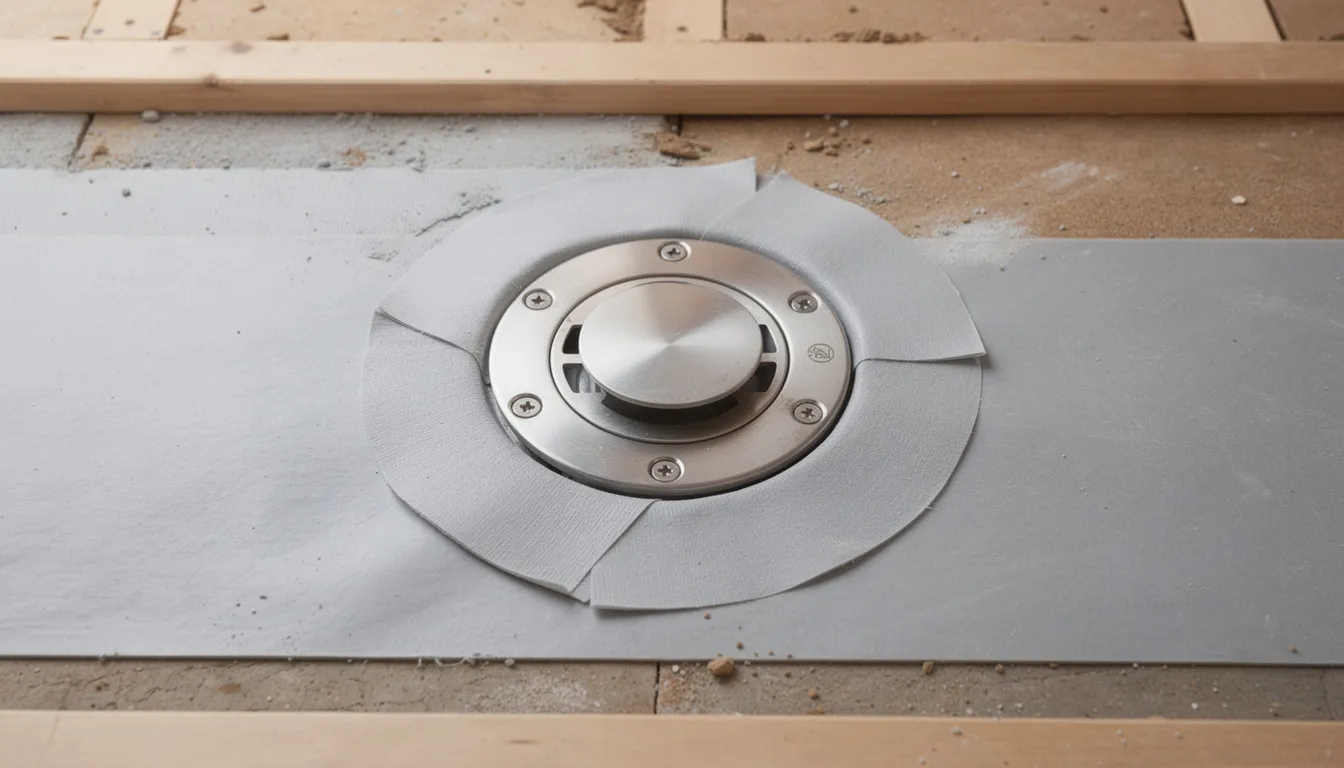
Drain Detailing
Where code requires a floor drain, use a stainless steel or PVC floor drain rated for expected temperatures. Slope the finished floor surface 1/4 inch per foot toward the drain. Extend the waterproofing membrane into the drain flange per the manufacturer's instructions.
Finished Floor Options
- Slip-resistant porcelain or ceramic tile (rated for wet/high-temp use)
- Sealed concrete with epoxy coating
- Removable cedar or teak duckboards over a waterproof substrate
Never leave bare OSB or standard plywood exposed to sauna moisture. These materials absorb water, swell, delaminate, and become breeding grounds for mold.
What About Vapor Barriers and Ventilation?
Heat retention requires both good insulation and an airtight interior shell. But moisture protection demands controlled ventilation, not random air leaks.
The Vapor and Air Barrier
In modern sauna construction, the primary vapor barrier and air barrier is the aluminum foil layer installed directly behind the wood cladding. Every leak in this layer allows humid air to migrate into insulation and framing cavities where it condenses.
Treat the foil barrier as your primary defense against moisture problems. If you get nothing else right, get this right.
Air Sealing Best Practices
- Cover walls and ceiling with continuous foil—no gaps, no patches
- Tape all overlaps with high-temperature foil tape, pressing firmly
- Seal outlet and switch boxes with foil tape or specialized gaskets
- Install weather-stripping around the door frame
- Seal carefully around heater penetrations and chimney shields
Simple Ventilation Strategy
A sauna requires fresh air to function properly and to dry out after use. For a 4×6 to 6×8 ft. infrared sauna indoor 2-person or traditional model, install:
Air intake (low): Position near or behind the heater, often under the door gap or through a dedicated vent. Cool, fresh air enters here, gets heated, and rises. Size the opening around 15-20 square inches.
Exhaust vent (high): Place on the opposite wall from the heater, near ceiling height. This should be adjustable so you can close it during heating, then open it during use and after sessions.
The "Bake and Dry" Routine
After every sauna session:
- Turn the heater to a moderate temperature (150°F or so)
- Open both intake and exhaust vents fully
- Leave the door slightly ajar
- Run for 15-20 minutes
This drives moisture out of wood, benches, and floors before it can condense. Many experienced users consider this routine as important as construction details for maintaining a mold-free space.
What Common Mistakes Should You Avoid?
Most sauna failures come from a handful of predictable errors that builders repeat year after year.
High-Impact Mistakes
Double vapor barriers: Using Kraft-faced batts (which have a paper vapor retarder) combined with foil creates two vapor barriers with insulation sandwiched between. Any moisture that enters becomes trapped with no path to dry.
Gaps around outlets and fixtures: A 1-inch gap around an electrical box can allow substantial moisture migration over time.
Bathroom-grade paint instead of membranes: Moisture-resistant paint on drywall is not waterproofing. In splash zones, use proper waterproof membranes.
Omitting thermal breaks on concrete: Building directly on or against cold concrete without rigid foam creates a massive heat sink.
Exposed foam in a hot room: Rigid foam or spray foam visible inside the sauna risks melting, off-gassing, and code violations.
Pre-Closure Inspection Checklist
Before installing cedar paneling, verify:
- [] Foil vapor barrier is continuous with no tears or gaps
- [] All foil seams are taped with high-temperature tape
- [] Outlets, switches, and light boxes are sealed around edges
- [] Mineral wool fills all stud and joist cavities completely
- [] Floor drain is installed with proper slope and waterproof membrane
- [] Vent openings are cut and framed (intake and exhaust)
- [] Heater clearances meet manufacturer specifications
Document Your Build

Take photos of every wall and ceiling before closing them up with paneling. Capture foil seam locations, outlet sealing, insulation fit, and drain connections. If moisture problems appear years later, these photos help identify where to look first.
How Do You Maintain Long-Term Performance?
Even the best home saunas need active maintenance to stay dry, clean, and structurally sound for 10-30 years.
After-Use Drying Routine
After every session, run your "bake and dry" cycle as described earlier. This simple habit is more effective at preventing mold than any expensive material or treatment.
Twice-Yearly Inspections
Walk through your sauna twice per year, looking for early warning signs:
- Musty or moldy smells when entering the cold room
- Dark spotting on wood surfaces, especially at floor-to-wall transitions
- Soft areas in wood paneling or benches
- Swollen or sticking door jambs
- Peeling or bubbling finishes on any surface
- Water stains on the ceiling or near penetrations
Catching problems early saves thousands in repairs compared to discovering widespread rot years later.
Monitoring Humidity
Keep a small hygrometer/thermometer just outside the sauna door. Monitor how quickly the humidity drops after sessions. A healthy sauna should return to ambient humidity within a few hours of the drying cycle.
Cleaning Practices
Clean tile, drains, and wood surfaces with mild, non-bleach cleaners. For wood benches and paneling, light sanding with fine-grit sandpaper (220-grit) every few years removes surface buildup and keeps wood fresh.
Avoid sealing interior cedar with polyurethane or varnish—this trap moisture and can off-gas at sauna temperatures.
Build Your Sauna Right the First Time
Proper waterproofing and insulation separate saunas that last decades from those plagued by mold, rot, and constant repairs. The strategies outlined here—mineral wool insulation, continuous aluminum foil vapor barriers, rigid foam thermal breaks, and active ventilation—represent decades of proven experience from builders who've learned what actually works.
The investment in doing it right the first time pays dividends immediately through faster heating times, lower energy costs, and reliable performance. More importantly, it delivers peace of mind knowing your structure is protected from the moisture damage that destroys improperly built saunas within a few years.
Whether you're building a compact apartment unit or an elaborate home sauna project, these fundamentals apply universally. Master the basics—continuous vapor barriers, adequate insulation, proper ventilation—and you'll create a wellness space that performs flawlessly for generations.
Ready to start your sauna project? Contact our specialists for personalized guidance on waterproofing, insulation, and building techniques.
FAQ
Can I retrofit waterproofing in an existing sauna?
Yes, but only to a point. If your existing sauna has bare studs behind cedar with no foil, you'll need to remove paneling to add insulation and continuous vapor barrier. Surface-applied sealers on wood will not stop vapor from entering wall cavities. A practical retrofit strategy is to empty the room, remove paneling on one wall at a time, add mineral wool and foil with taped seams, re-panel, and repeat. This minimizes disruption while achieving proper moisture protection.
Is waterproofing required on all walls?
For a traditional dry or Finnish sauna that isn't routinely hosed down, full waterproofing membranes on every vertical surface are usually unnecessary. Most builders limit the use of robust membranes (sheet or liquid water proofers) to floors, lower wall sections around the stove, and tile surfaces that are exposed to splash water. Above that level, the primary defense is the foil vapor barrier behind wood paneling plus good ventilation.
What is the recommended insulation thickness for cold climates?
For outdoor saunas exposed to winter temperatures well below freezing, aim for at least 2×6 walls with an R-value of 21 to 23 using mineral wool, and ceilings with an R-value of 30 or more. Floors over ground or slabs should include at least 1.5 to 2 inches of rigid foam (R-7.5 to R-10). Thicker assemblies significantly reduce warm-up time—often cutting heating time by 30-40%.
Can I use standard bathroom exhaust fans?
Standard bathroom exhaust fans are not designed to withstand temperatures exceeding their ratings (usually 104-140°F maximum) within the hot zone. However, you can use a bathroom-type fan mounted outside the hot room, with ductwork and a metal vent hood penetrating the sauna wall near the ceiling. Keep the motor and plastic housing in a cooler adjacent room.
Do infrared saunas need different waterproofing?
Infrared saunas run at lower air temperatures (often 110-140°F), so moisture and heat loads are somewhat reduced, but the same basic principles apply. The health benefits of infrared saunas remain consistent regardless. Insulate walls and ceiling appropriately for your climate, include a continuous foil or suitable vapor barrier, and ensure any surfaces that might see sweat or light washing are protected.