
Building an outdoor sauna transforms your backyard into a personal wellness retreat. While the installation process requires careful planning and attention to detail, this project can be completed by motivated DIYers with moderate construction experience.
This comprehensive guide walks you through every phase, from initial permits through final testing. Whether you're installing a prefab kit or building a custom traditional sauna, proper preparation ensures safe installation and years of reliable performance.
The sauna industry has seen tremendous growth as people prefer the convenience and privacy of their own backyard wellness space over commercial facilities. Modern sauna kits and improved design expertise have made these projects more accessible than ever.
Key Takeaways
- DIY outdoor sauna projects typically take 14-20 hours spread over 3-4 weekends, requiring proper foundation preparation, electrical work, and ventilation systems
- Choose a level location within 50 feet of your electrical panel with good drainage and protection from prevailing winds
- Cedar and spruce wood saunas require foil vapor barriers and R-12 insulation, while barrel saunas often need minimal insulation
- Electric heaters require 240V circuits with proper GFCI protection and must maintain 50cm minimum clearance from combustible materials
- Regular maintenance includes monthly cleaning, annual wood treatment, and seasonal electrical system inspection
What Planning and Permits Do You Need Before Installation?
Before breaking ground, thorough planning ensures compliance with local authorities and prevents costly mistakes.
Understanding Permit Requirements
Contact your local building department to determine the permit requirements for outdoor structures that exceed 100 square feet. Many municipalities exempt smaller accessory structures from full building permits but still require zoning compliance and electrical permits.
Check homeowner association rules and property setback requirements from lot lines. Most areas require a 5-10 feet setback from property boundaries, with additional distance requirements from the primary dwelling.
How Should You Plan the Electrical System?
Verify your electrical panel capacity can handle the 240V sauna heater load, typically 6-9kW for standard residential installations. A licensed electrician should evaluate your power supply during the planning phase to avoid expensive upgrades later.
Plan utility access for electricity and, optionally, a water connection for cleaning purposes. Underground electrical lines and water lines require proper protection and may necessitate obtaining trenching permits.
Schedule electrical rough-in inspection if required by local codes. Many areas require inspection before covering electrical work, making early coordination essential for managing the project timeline.
How Do You Prepare the Site and Build the Foundation?
Proper site selection and foundation work form the backbone of any successful installation.
Clearing and Leveling the Installation Area
Clear and level the installation area extending 3 feet beyond the sauna footprint on all sides. This extra space accommodates construction activities and provides long-term access for maintenance. Remove all vegetation, debris, and organic material that could decompose and create settling issues.
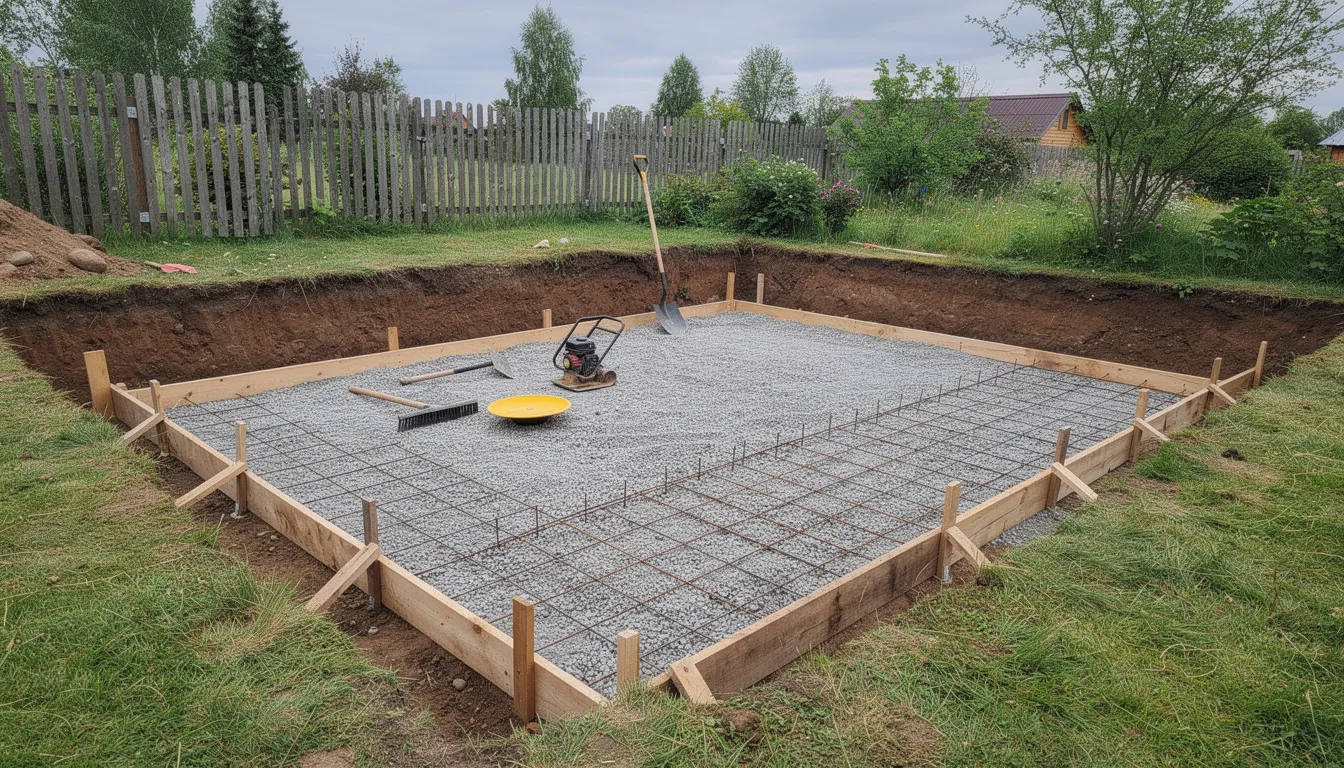
Excavate 6 inches deep and create a gravel base with 4 inches of compacted crushed stone. This foundation system provides excellent drainage and prevents frost heave in cold climates, according to building foundation standards from the International Code Council. Use a plate compactor to achieve proper density.
What Foundation Options Work Best?
Install concrete pier blocks or pour a 4-inch concrete slab with proper drainage slope. Concrete foundations provide maximum stability for heavier wood-burning saunas, while pier blocks are suitable for lighter sauna kits.
Allow concrete to cure for a minimum of 7 days before beginning sauna assembly. During curing, protect the concrete from temperature extremes and maintain proper moisture levels.
Install a vapor barrier beneath the foundation to prevent ground moisture from entering. Use heavy-duty polyethylene sheeting with sealed overlaps for maximum effectiveness.
Which Foundation Type Should You Choose for Different Saunas?
Different sauna designs require specific foundation approaches. When comparing ‘outdoor infrared vs indoor infrared sauna’ installations, outdoor models face more weather exposure and need more robust foundations.
Barrel saunas require level concrete pads or treated lumber cradles spaced 4 feet apart. The curved design distributes weight differently than traditional rectangular structures, making proper support spacing critical.
Cabin-style saunas need full perimeter foundations with frost protection below the local frost line. These larger structures generate significant loads and require engineered foundation systems in many jurisdictions.
Prefab kit saunas typically include specific foundation requirements in the installation manual. Following these specifications exactly ensures proper fit and maintains manufacturer support.
How Do You Frame and Assemble the Structure?
The framing phase transforms your prepared foundation into the basic sauna structure.
Building the Floor and Wall Frames
Construct the floor frame using pressure-treated 2x6 lumber spaced 16 inches on center. This spacing provides adequate support for the sauna structure and occupant loads while accommodating standard insulation dimensions.
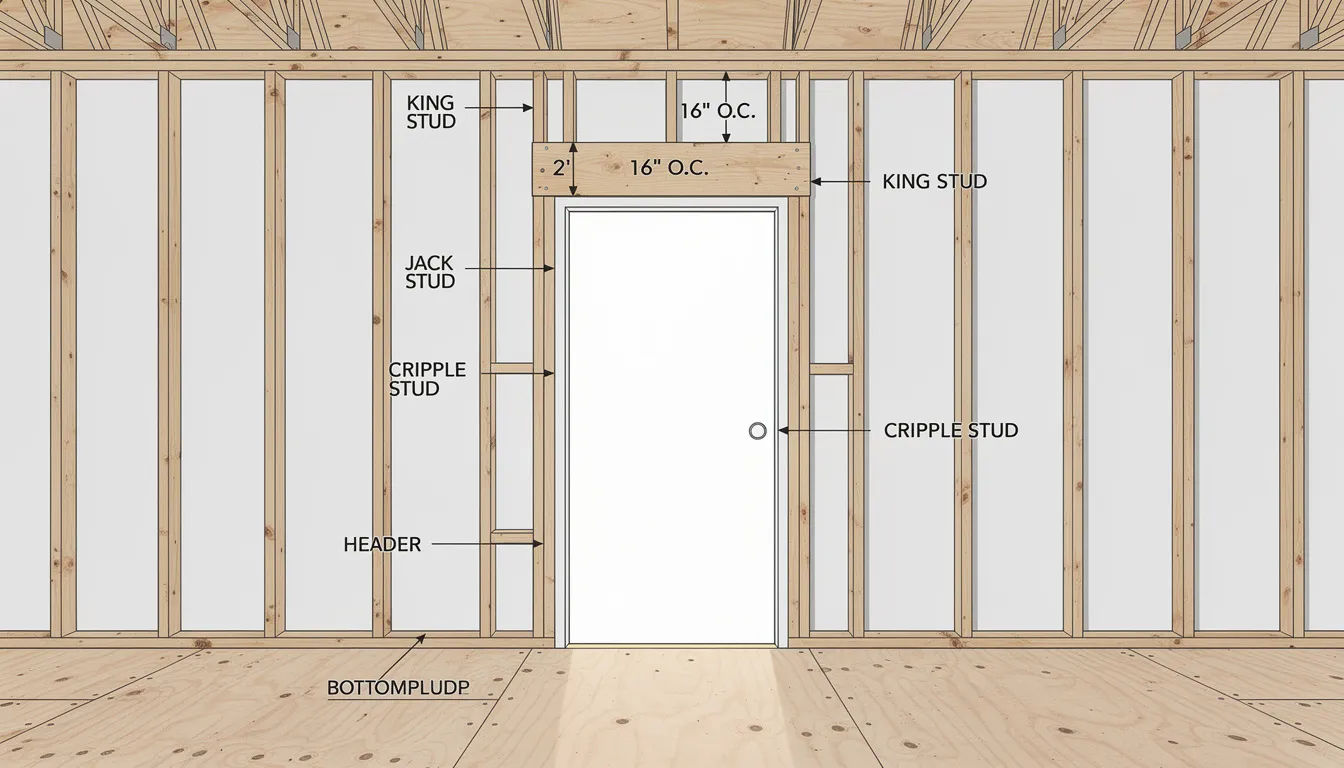
Install wall framing with 2x4 studs at 16-inch centers, using 2x6 if the ceiling span exceeds 10 feet. All framing must be plumb and square to prevent assembly problems later.
How Do You Frame the Door and Bench Support?
Frame the door opening to 27.5 inches wide by 76.5 inches tall for standard sauna doors. The sauna door must open outward for safety compliance, as outlined in residential building safety codes.
Add blocking for bench supports at 18-inch and 36-inch heights from the floor. This blocking provides secure attachment points for the two-tier bench system.
Install roof rafters or trusses in accordance with local snow load requirements. The roof system must support seasonal snow accumulation, as well as the weight of the roofing materials.
What Insulation and Vapor Barrier Do You Need?
Proper thermal envelope construction separates quality installations from amateur attempts.
Fill wall and ceiling cavities with R-12 fiberglass insulation, avoiding compression. Cut insulation carefully to fit snugly without gaps while maintaining full loft.
Install a foil vapor barrier over the interior framing with the foil side facing the interior. This critical component reflects radiant heat back into the sauna while preventing moisture migration into wall cavities.
Seal all vapor barrier seams with aluminum tape to create a continuous moisture barrier. Any gaps in this barrier allow humid air to penetrate insulation, causing condensation and potential mold growth.
Leave a 1/2-inch gap at the bottom of walls for ventilation airflow. This gap allows for proper air circulation, which is essential for traditional sauna operation.
How Do You Handle Electrical Rough-In and Heater Preparation?

The electrical system powers your sauna heater and lighting while maintaining safety in the high-temperature, high-humidity environment.
Running Power to Your Sauna Heater
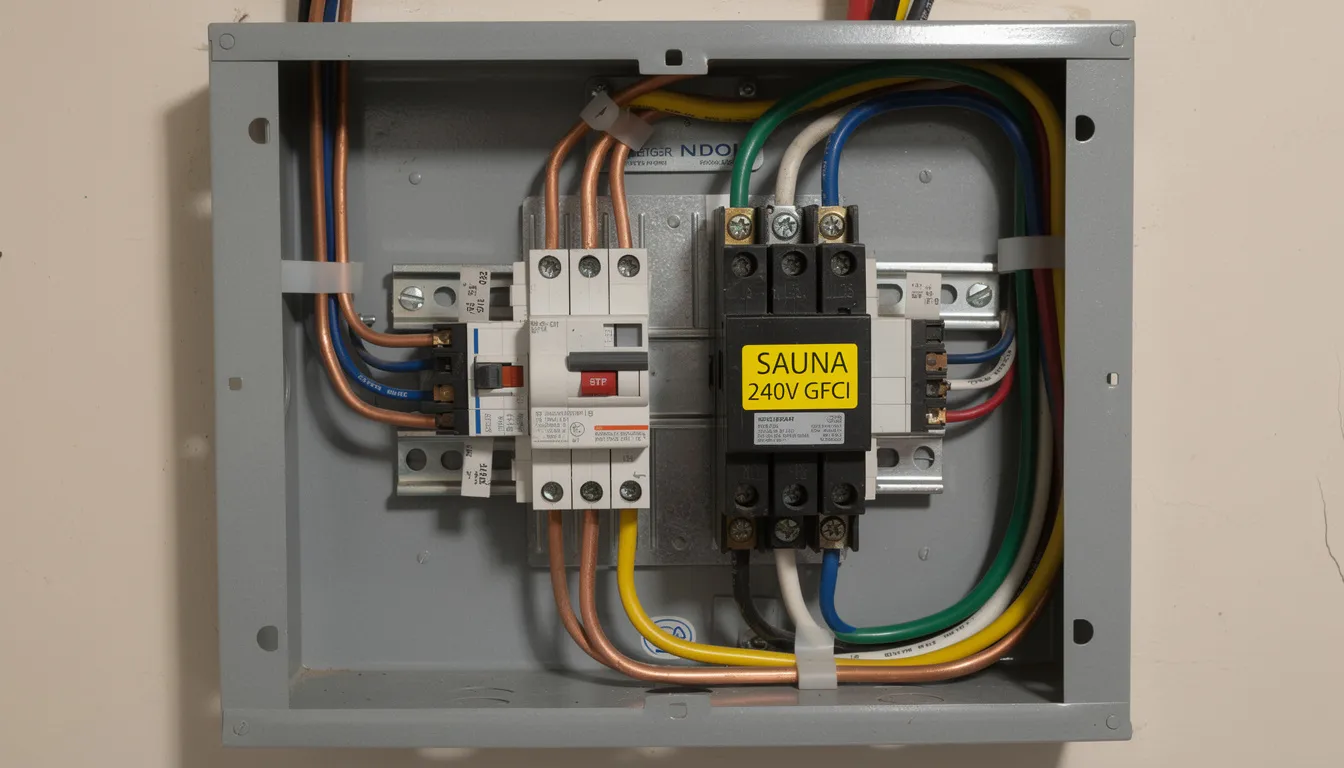
Run a 240V electrical circuit from the main panel using appropriate wire gauge, typically 8-10 AWG. The circuit size depends on heater capacity and distance from the panel.
Install a dedicated 40-amp breaker and GFCI protection as required by local electrical codes. According to National Electrical Code standards, GFCI protection is mandatory in wet locations.
What Controls and Lighting Should You Install?
Rough-in thermostat wire to the control location if using external temperature control. Many electric heaters utilize remote controls to protect electronics from overheating.
Install a sauna light fixture box rated for high temperatures, with a minimum 200°F rating. Standard electrical boxes fail in sauna conditions, creating fire hazards and code violations.
Schedule an electrical inspection before installing interior finishes. Most codes require the inspection of rough electrical work before it is covered with insulation and cladding.
Where Should You Position the Heater?
Position the electric heater at least 50cm away from wooden surfaces and 75cm from benches. These distances prevent accidental contact and reduce the risk of fire from overheated wood.
Ensure adequate airflow around the heater, maintaining a minimum clearance of 10cm on all sides. Restricted airflow can cause overheating and reduce heater life.
Plan heater guard installation using 2x2 posts and 1x3 horizontal rails. The guard prevents accidental contact while allowing proper airflow around heated stones.
Verify that the heater capacity matches the sauna interior volume, typically 1kW per 45 cubic feet. Proper sizing delivers the full range of infrared sauna health benefits. Learn more about the proven health benefits of regular sauna use to maximize your wellness routine.
How Do You Install Interior Cedar Finishing?
The interior finishing phase transforms the basic structure into a functional sauna.
Installing Cedar Boards Properly
Install tongue-and-groove cedar boards horizontally, starting from floor level. This orientation creates visual continuity and simplifies installation around obstacles.
Blind nail through the tongue using 1.5-inch galvanized nails to conceal fasteners. Hidden fasteners create clean lines while preventing nail holes that could harbor moisture.
What's the Proper Sequencing for Interior Boards?
Install ceiling boards first, then wall boards, leaving a 1/2-inch ventilation gap at the floor. This sequence ensures tight joints at the ceiling while maintaining the required ventilation gaps.
Cut the final board to fit precisely, maintaining consistent spacing throughout the installation. Careful measurement and cutting create professional results and prevent gaps that compromise thermal performance.
Add corner moldings and trim pieces for a professional appearance. These finishing touches cover joint irregularities and provide clean transitions between surfaces.
How Do You Build and Install the Benches?
The bench system defines the sauna experience, offering comfortable seating in various temperature zones.
Build a two-tier bench system with the lower bench at 18 inches and the upper bench at 36 inches. This configuration allows users to choose comfortable temperature levels, as hot air stratifies with the hottest air near the ceiling.
Use clear 2x4 cedar boards spaced 1/4 inch apart for bench tops. These dimensions provide comfortable seating while allowing moisture drainage and air circulation.
Fasten bench boards from underneath to hide all fasteners on the seating surface. Exposed fasteners become extremely hot and create burn hazards during sauna sessions.
Install backrests at a 75-degree angle for comfort during sauna sessions. This angle provides optimal support for extended sessions while preventing excessive heat exposure to the back.
Sand all bench surfaces smooth and round over sharp edges. Well-sanded surfaces also accept annual oil treatments more evenly, ensuring the best experience from the best home saunas.
How Do You Install the Door and Ventilation System?
Proper door installation and ventilation design ensure safety and optimal performance.
Installing Your Sauna Door Correctly
Install the pre-hung sauna door opening outward for safety compliance. Outward opening prevents doors from being blocked during emergencies and allows for an easy exit, even when crowded.
Adjust the door frame to be square and level, using shims as necessary for proper operation. Misaligned doors bind during temperature cycling, compromising sealing.
Install door hardware, including a sauna-rated handle and magnetic catch. Standard hardware fails in sauna conditions, creating safety hazards and operational problems.
What Ventilation System Works Best?
Cut an intake vent near floor level, approximately 6 inches above ground. This placement allows fresh air to enter while preventing debris intrusion.
Install an exhaust vent near the ceiling on the opposite wall for proper air circulation. This configuration creates cross-ventilation that maintains air quality without creating uncomfortable drafts, according to ventilation research from the American Society of Heating, Refrigerating and Air-Conditioning Engineers.
How Do You Complete Final Electrical Connections?
The final electrical phase connects all components and tests system operation.
Connect the heater according to the manufacturer's wiring diagram and local electrical codes. Proper connections ensure safe operation and maintain warranty coverage.
Install thermostat control and test all electrical connections before energizing. The control system maintains target temperatures while providing safety shutoffs for overheating conditions.
Mount the sauna light fixture and connect it to the appropriate circuit. Sauna lighting requires a high-temperature rating and proper moisture protection.
Schedule final electrical inspection if required by the local authority. This inspection verifies code compliance and ensures the safe installation of the system.
How Do You Test and Start Initial Operation?
Systematic testing verifies proper installation and identifies any issues before regular use begins.
Conduct an initial heat-up test without users to verify proper operation. Monitor all systems during the initial heating cycle to identify any potential issues.
Monitor temperature rise to ensure the heater reaches the target temperature within 45 minutes. Proper installations achieve 180°F in well-insulated saunas within this timeframe.
Check the effectiveness of ventilation and adjust the vent openings as necessary. Proper ventilation maintains air quality without excessive heat loss.
Test all safety features, including door operation and emergency procedures, to ensure they are functioning properly. Ensure the door opens easily and all electrical systems operate correctly.
Allow the sauna to complete several heat cycles before first use. This process cures finishes and allows wood to acclimate to operating conditions.
How Do You Maintain Your Outdoor Sauna Long-Term?
Regular maintenance preserves your investment and ensures continued safe operation.
Clean interior surfaces monthly with a damp cloth and mild soap solution. Avoid harsh chemicals that could off-gas at high temperatures.
Apply cedar oil treatment annually to maintain the wood's appearance and protection. This treatment preserves natural oils and prevents drying that leads to cracking.
Replace sauna stones every 2-3 years, or when they become cracked or crumbling. Damaged stones reduce heating efficiency and can create hot spots.
Inspect electrical connections and heater operation periodically throughout the year. Look for signs of overheating, loose connections, or damage to heating elements.
Check the roof and exterior wood finish annually, refinishing as needed. Weather exposure gradually degrades exterior finishes, allowing moisture intrusion.
How Do You Winterize Your Outdoor Sauna?
Cold weather presents additional challenges for operating an outdoor sauna.
Ensure proper drainage away from the foundation to prevent freeze damage. Standing water near the foundation can cause heaving and structural damage.
Check and seal any gaps in exterior finish to prevent heat loss. Air leaks reduce efficiency and can cause ice formation, which can damage the structure.
Inspect the roof for snow load capacity and remove excess accumulation. Heavy snow loads can exceed design limits, causing structural damage.
Test the heating system before the peak winter usage period. Verify all components operate correctly before depending on the system during cold weather.
Research from the Finnish Sauna Society shows that regular winter sauna use can support immune system health.
Transform Your Backyard into a Wellness Sanctuary
The complete installation process requires meticulous attention to detail and adherence to local regulations. While challenging, this rewarding project creates a valuable addition to your property that provides years of enjoyment.
Whether you opt for DIY sauna kits or hire professionals, proper planning is essential for success. Start with thorough research of local requirements and building codes to avoid costly mistakes.
The sauna industry continues evolving with new materials and techniques that reduce costs while improving performance. However, fundamental principles of solid foundation, proper ventilation, and quality materials remain unchanged.
The chosen location impacts both cost and long-term satisfaction. Consider factors including access to utilities, privacy, and integration with existing outdoor living spaces when making this decision.
Professional design and installation expertise may provide excellent value for complex installations or where local regulations require licensed contractors. Evaluate your skills honestly and seek professional help where needed.
Ready to start your sauna journey? Contact our team for expert guidance on selecting and installing your dream wellness retreat.
FAQ
How do you choose an outdoor sauna?
Select options based on available space, capacity requirements, preferred heating type, and budget. Consider whether you want a 1-person home sauna for personal use or an infrared sauna for two people, ideal for shared experiences. Evaluate warranty coverage, material quality, energy efficiency ratings, and installation complexity. Review customer feedback about brand reliability and after-sales support to make an informed decision.
How long does it take to install an outdoor sauna?
Complete installation typically requires 14-20 hours for experienced DIYers, spread over 3-4 weekends. Professional installation usually takes 2-3 days, including electrical work. The timeline varies depending on sauna size, foundation type, and whether you're installing prefab kits or building from scratch. Weather conditions and permit approval times can also affect the overall project duration.
What's the minimum distance required between the sauna and the property lines?
Most municipalities require a 5-10-foot setback from property lines for accessory structures. Check local zoning codes, as requirements vary significantly by location. Some areas may require greater distances for structures with heating elements, while others have different rules for weatherproof outdoor infrared sauna installations versus traditional wood-burning models. Homeowner associations may impose additional restrictions beyond those required by the municipality.
Can I install an outdoor sauna without a concrete foundation?
Yes, properly constructed gravel pads with concrete pier blocks work well for most sauna types. Ensure adequate drainage and frost protection below the local frost line depth. This foundation option is particularly suitable for prefab kits and barrel saunas. The key is maintaining a level, stable base that prevents settling and moisture intrusion while providing adequate support for the structure's weight.
Do I need special wiring for outdoor sauna electrical connections?
Outdoor saunas require GFCI-protected circuits with appropriate weatherproof enclosures. Use direct burial cable or conduit protection for underground electrical runs. A dedicated 240V circuit is standard for most residential installations, typically requiring 40-amp service. Always hire a licensed electrician who is familiar with local codes to ensure a safe and compliant installation. The electrical work often represents a significant portion of the total infrared sauna price.
How often should outdoor sauna wood be treated or refinished?
Exterior cedar should be treated every 1-2 years, depending on the level of climate exposure. Interior wood typically requires minimal treatment but benefits from annual applications of cedar oil. Regular maintenance protects against UV damage, moisture intrusion, and temperature extremes. High-quality wood treatments extend the life of your sauna significantly while maintaining its aesthetic appeal. Pay special attention to horizontal surfaces and areas exposed to direct weather.